Shake off the winter cobwebs and prep your vessel for a flawless season on the water.
As the days get longer and the temperatures rise, the urge to hit the open water grows stronger. But before you turn that key, your boat needs a little TLC to transition from winter hibernation to peak summer performance. This comprehensive "breakout" strategy ensures your Suzuki outboard, trailer, and entire vessel are safe, reliable, and showroom-ready.
Phase 1: Hull & Exterior Inspection
Start by removing the grime of the off-season so you can clearly inspect every inch of your boat.
- Deep Clean: Wash off the winter grime with a dedicated marine soap. Skip the dish detergent—it’s too harsh and will strip off your protective wax.
- The Walk-Around: Check your thru-hull fittings for any cracks or damage. Pay special attention to the intake grates to ensure they aren't crushed or clogged with debris that could choke off water flow.
- Protect the Finish: Once clean, throw on a coat of marine wax or a hybrid ceramic spray. It’s not just for looks—it adds a necessary layer of protection against the summer sun.
- Vinyl Rehabilitation: If you spot mildew on your seats or bolsters, resist the urge to use harsh household bleach. Instead, use a dedicated marine vinyl cleaner with a soft brush or melamine sponge to lift stains without drying out the material. Finish with a UV protectant to keep the vinyl supple.

Phase 2: Power, Lighting & Electronics
A dead battery is the number one mood killer on launch day. Ensure your electrical backbone is solid.
- Battery Health & Security: Inspect batteries for swelling, leakage, or corrosion. Top off wet-cell fluid levels with distilled water. Crucially, check and tighten your battery hold-downs. Vibration is a battery killer, and loose mounts can lead to cracked cases or shorted terminals.
- The "Key On" Cycle: Turn the key to the ON position. Listen for the self-test beeps and confirm that all warning lights on your gauge cluster illuminate briefly.
- Lighting Audit: Flip every toggle switch. Clean the contacts on navigation and anchor lights with a wire brush if they are flickering. Pro Tip: If you are still using old incandescent bulbs, now is the perfect time to upgrade to LEDs for brighter light and lower amp draw.
- Wiring Audit: Visually inspect engine sensor connectors and the wiring harness. Look for loose connections or green corrosion that might have formed over the winter.

Phase 3: Critical Fluid Analysis
Even if you winterized properly, fluids can degrade or accumulate moisture over months of inactivity.
- Fuel Quality Inspection: Stale fuel is an engine's worst enemy. Draw a small sample into a clear glass jar. If you see separation (a distinct layer of water at the bottom) or cloudiness, the system needs to be drained.
- Engine Oil Integrity: Check the dipstick. The oil should be golden or light brown. If it looks milky (water intrusion) or smells heavily of burnt carbon, change it immediately.
- Gear Lube Check: Inspect the lower unit gear lube. Like the engine oil, a milky appearance indicates a seal failure that let water in.
Phase 4: Mechanical Linkages & Engine Prep
Ensure the physical connection between you and the engine is smooth and responsive.
- Evict the Squatters: Remove the engine cowling and perform a detailed pest check. Look for bird nests, mud dauber wasps, or ants inside the air intakes, under the cowling, or blocking the exhaust path.
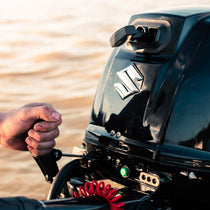
- Throttle & Shift Feel: Move the levers through their full range (with the engine off, spin the prop by hand to engage gears). Check for stiffness, binding, or hesitation.
- Steering Sweep: Turn the steering wheel lock-to-lock to feel for "play" or grinding.
- Lubrication: Lightly grease exposed mechanical linkages at the engine and steering pivots.
- Propeller Rehab: Remove the prop to check for fishing line wrapped around the shaft. Grease the shaft generously before re-installing.
Phase 5: Safety & Support Systems
These auxiliary systems are critical for safety and comfort.
- Bilge Pump Verification: Don't just turn the manual switch on. Reach into the bilge and manually lift the float switch to ensure the pump engages automatically. Test this with and without the battery switch ON to verify how your boat is wired for emergency water evacuation.
- Freshwater Recommissioning: If your boat has a freshwater tank that was winterized, flush out the antifreeze. Use a fresh water system treatment to sanitize the lines and eliminate any chemical aftertaste.
- Hydraulics Check: Cycle the trim and tilt fully up and down. Listen for hesitation or air bubbles, and inspect trim rams for fluid seepage.
Phase 6: The Ultimate Trailer Shakedown
Your boat is only as reliable as the trailer getting it to the water. Do not skip these steps.
- Tires & Lug Nuts:
● Check the Age: Trailer tires tend to dry rot long before the tread wears down. Find the date code on the sidewall—if they’re older than 5 or 6 years, swap them out, even if they still look new.
● Tire Pressure: Fill them to the max PSI listed on the tire (usually 50 or 65), don't just eyeball it. And definitely don't forget the spare.
● Tighten the Lugs: Lug nuts can loosen up while sitting in storage. Go around and re-torque everything to spec before you hit the road.
- Hubs & Bearings:
● The Wiggle Test: Jack up each wheel safely. Grab the tire at 12 and 6 o'clock and try to rock it. Significant play indicates a bearing issue.
● The Spin Test: Spin the wheel. It should be silent. Grinding or rumbling sounds mean a bad bearing.
● Grease Inspection: If you have bearing buddies, ensure they are full but not blown out. If the grease looks milky/white, water has breached the seal.
- Bunks & Rollers:
● Bunks & Brackets Check the carpet for tears—you don't want your hull sitting on raw wood or bolt heads. Look for heavy rust on the brackets (a major weak point in saltwater) and make sure the rollers aren't stuck or flat-spotted.
● Winch & Strap Unspool the strap a few feet. Any sun bleaching or fraying? Swap it out. It’s a cheap fix that prevents a major disaster.
● Coupler & Chains Grease the mechanism and ball socket. Make sure the locking pin seats fully. Check the safety chains for deep rust and test that the S-hooks latch properly.
- Lights & Brakes:
● Connector Hygiene: Clean the 4-pin or 5-pin connector with contact cleaner and dielectric grease.
● Brake Actuator: If you have surge brakes, check the master cylinder fluid level. Push the actuator tongue in manually (with a screwdriver or bar) to ensure it slides freely and isn't seized from rust.
Phase 7: The Driveway Dry Run
The final test before leaving your house.
- The "Ear Muff" Test: Hook the boat up to a garden hose using motor flusher "ear muffs." Start the engine and immediately confirm a strong, steady "tell-tale" stream of water.
- Impeller Intelligence: If the stream is weak, the impeller may have taken a "set" (warped) during storage. Replace it if in doubt.
- Thermostat Check: Allow the engine to warm up slowly to verify the thermostat isn't stuck open or closed.
- Leak Check: While running, check fuel lines and filters for weeping under pressure.
Phase 8: The Launch Day Protocol
The moment of truth at the ramp.
- Dockside Idle: Let the engine idle at the dock for a few minutes. Watch your voltage gauges and cooling water flow.
- Engagement Check: Verify smooth idle and clean shift engagement into forward and reverse before leaving the no-wake zone.
- Record Keeping: Note your engine hours at the start of the season and reset any maintenance intervals on your engine software.
Ready to Launch?
Spending the weekend on a proper shakedown means your first trip is about enjoying the water, not dealing with headaches. It’s a lot easier to fix these things in your driveway than it is to troubleshoot them while you're floating at the ramp.
If you stumble across something that looks complicated or broken during your check, don't just guess. Call a certified Suzuki tech to get it sorted before you launch. It’s worth the peace of mind to make sure your season starts safely. Safe boating!