Whether you’re rigging a brand-new Yamaha outboard or restoring a classic hull, getting your cable setup right is a big deal. Control and gauge cables are the backbone of your boat’s communication system. They affect everything from throttle feel to engine feedback. Mess it up, and you’re in for friction, lag, or worse.
Choosing the right cable type, length, and route helps ensure smoother operation, longer-lasting components, and improved data transmission at the helm. This guide breaks down the types Yamaha offers, how to pick the right one, and what to avoid.
Types of Yamaha Control Cables
Yamaha offers different cable systems, depending on whether you’re using mechanical or digital controls. Knowing what fits your engine and helm setup is step one.
Mechanical Control Cables
These throttle and shift cables use a simple push-pull system. They move input from your control lever to the engine’s throttle and gear setup. It’s a classic system and is still used in many analog rigs and earlier-generation outboards.
Yamaha-compatible mechanical cables come in several versions. Some are universal, while others are designed for smoother performance, lower friction, and improved flexibility, ideal for tighter rigging paths or more complex installations. Higher-end models may include stainless steel fittings, reinforced liners, or UV and corrosion resistance, which are particularly important in saltwater setups.
Pros of Mechanical Cables
-
Reliable and time-tested—used in all kinds of setups for decades
-
Affordable—usually cheaper than digital systems
-
DIY-friendly—easy to install, adjust, and replace
-
Widely compatible—works with many Yamaha controls, especially older ones
-
No electronics—no need for software or networked systems
Cons of Mechanical Cables
-
Wear and tear—friction, heat, and moisture wear them down over time
-
Friction adds up, especially in longer or tighter runs
-
No fancy features—can’t support joystick docking or engine diagnostics
-
Higher resistance under load, especially in more complex or dual-engine installs
-
More visible clutter—cables often run through the splashwell or transom
Over time, mechanical cables wear down from repeated use, heat exposure, and sharp bends. You might notice a sticky throttle or stiff shifting. Swapping in a fresh cable—correct length and all—usually brings things back to smooth and snappy.
If you're running a single-engine analog setup, these cables are still a solid, cost-effective choice. But if you’re after a cleaner install or more helm features, Yamaha’s digital systems might be worth exploring.

Digital (DEC) Cables
Digital Electronic Control (DEC) is Yamaha’s fly-by-wire system. It ditches the old-school throttle and shift cables and replaces them with electronic signals. When you push the lever, sensors relay your input through a digital harness to the engine's control module, fast and precise.
You’ll find DEC in systems like:
-
Command Link / Command Link Plus – digital gauge networks for sharing data
-
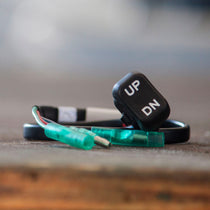
Helm Master / Helm Master EX – advanced multi-engine systems with joystick control, autopilot, and position holding
Benefits of DEC Systems
-
Super-smooth throttle and shift with no mechanical drag
-
No cable maintenance—fewer wear points
-
Works with premium features like joystick docking and multi-helm stations
-
Cleaner, simpler rigging with fewer cables and tighter routing
Downsides
-
More expensive—electronic parts and programming add cost
-
Compatibility limits—only for Yamaha outboards designed for DEC
-
Complex setup—you’ll likely need a certified Yamaha tech to install and calibrate it
DEC is a great fit for high-performance or offshore rigs. Just keep in mind—it’s not a drop-in upgrade for every boat. Double-check that your engine supports it, and plan on professional help for installation.
Gauge Cable Systems
Outboard gauges need more than the right display—they also need proper cables. Your gauge cable setup depends on engine type and how your gauges connect.
Gauge Cable Overview
Yamaha supports multiple rigging systems to handle both analog and digital gauges. What you need depends on your engine model, rigging style, and helm features.
Common setups include:
-
Analog-style wiring – for basic instruments like tachs, speedometers, and fuel gauges. These often pair with mechanical control systems and use dedicated wire harnesses.
-
Digital network-style cabling – used with multifunction tachs and digital fuel systems. These often involve bus-style networks and hubs for sharing data between components.
-
Touchscreen or multifunction displays – high-end setups may require special integration cables or digital harnesses, especially when adding fuel flow data, GPS input, or diagnostics. Some connect to NMEA 2000 networks too.
The main goal here is compatibility to make sure your engine, gauges, and harnesses speak the same language. Newer digital engines need network-style cable systems. Older motors might use separate wires for each gauge input.
If you’re unsure, Yamaha’s rigging docs or a marine electronics pro can help you match everything up.

Measuring and Selecting Cable Length
This step is often overlooked, but it matters. A cable that’s too short causes tension, friction, or failure. Too long, and it becomes a tangled mess.
Tips for measuring:
-
Use a flexible rope, measuring tape, or fish tape to follow the real rigging path—include curves and any bulkhead pass-throughs
-
Account for tilt and steering—leave slack for engine movement
-
Add 1.5 to 2 extra feet for smooth bends and tight spaces
-
Avoid sharp turns—they increase resistance and shorten cable life
-
Round up—if your route lands between cable sizes, choose the next longest one
Getting cable length right keeps everything smoother, cleaner, and easier to maintain.
Troubleshooting Yamaha Control & Gauge Cable Issues
Even high-end cables can run into issues particularly with age or poor installs. Heat, tight bends, moisture, or mismatched parts can all cause trouble. Spotting early signs helps you fix things before they turn into a bigger headache.
Sticky or Jerky Throttle
Symptoms: Throttle lever feels stiff or inconsistent when accelerating
Causes:
-
Kinked or crushed cable from tight routing
-
Internal corrosion from moisture or salt
-
Tight bend radius—under 8 inches adds resistance
-
Dried-out liner—older cables lose their lube
Fix: Check for visible bends or damage. Disconnect the engine end and move the lever to test it freely. A little marine cable lube might help, but if it still sticks, replace it. Go with a longer size if needed, and make sure the route is clean.
Inaccurate or Dead Gauges
Symptoms: Gauges freeze, give wrong info, or show nothing
Causes:
-
Loose or damaged harness connections
-
Blown fuse in the gauge power circuit
-
Unfinished or miswired digital network
-
Mismatched gauge type vs engine interface
Fix: Check harnesses and fuses first. Look for broken wires, corroded pins, or heat exposure. Use Yamaha-approved adapters for digital networks and verify gauge compatibility. A simple mismatch can knock everything offline.
Engine Won’t Shift
Symptoms: Shift lever moves, but engine doesn’t engage or feels stuck
Causes:
-
Shift cable tension is off—too tight or loose
-
Cable is too short or stretched
-
Using the wrong generation cable (GEN I vs GEN II)
-
Control box internals worn or broken
Fix: Disconnect the shift cable and try moving the engine's shift rod by hand. If that works, the cable’s likely the problem. Replace it with the correct spec and inspect the control box for worn parts while you’re at it.
Common Mistakes to Avoid
-
Using the wrong generation cable – GEN I and GEN II aren’t interchangeable
-
Cutting it too close on length – Short cables get pulled tight and fail early
-
Mixing analog and digital – They won’t communicate unless properly matched
-
Over-tightening zip ties – You’ll crush the cable and increase resistance
-
Routing near high-current wires – Especially with digital signals, this creates interference
Final Thoughts
Rigging your Yamaha with the right cables isn’t just about convenience—it’s about smooth control, clean data, and long-term reliability. Whether you go mechanical or digital, getting the right parts and routing them properly pays off every time you fire up the engine.
Not sure which system you’ve got? Check your engine’s rigging guide or talk to a Yamaha dealer. Spending a little time upfront saves you a lot of headaches down the line.