Ensuring an outboard motor's peak performance and longevity is a top priority for every boat owner. One core element of motor maintenance is lower unit integrity, a vital component that transforms engine power into motion.
Failures within this unit, often due to seal leaks, can result in costly repairs and reduced motor lifespan. This guide provides a step-by-step approach to conducting a lower unit pressure test, ensuring that your Yamaha outboard remains in peak condition.
A lower unit pressure test checks whether the gearcase seals are holding properly. After draining the gear oil, attach a pressure tester to the vent or drain port, pressurize to about 10–15 PSI, and watch for pressure loss while checking shaft seals and gaskets with soapy water.
In the video embedded within this article, the Yamaha lower unit pressure test was performed on a Yamaha F115 outboard. However, the video and the step-by-step instructions included within this article apply to:
- F115
- VF115
- F150
- VF150
- F175
- F200
- VF200
- F225
- VF225
- F250
- F250 3.3L V6
- VF250
- F300 4.2L V6
What You’ll Need for the Job
- Pressure gauge
- Pressure pump or hand pump
- Spray bottle with soapy water
- Drain pan
Understanding the Importance of Seal Integrity
The lower unit of a Yamaha outboard motor is a complex arrangement of gears, shafts, and bearings, all operating within a confined space filled with lubricating gear oil. The seals in the lower unit are the unsung heroes that maintain this environment, preventing water intrusion and ensuring that the lubricating oil stays where it's needed. But what makes these seals so crucial?
- Protection Against Water Intrusion: Water and metal machinery are natural adversaries. When water breaches the internal spaces of the lower unit, it can lead to corrosion of components, diminishing their efficiency and lifespan. Over time, water mixed with gear oil can form an emulsion that reduces the lubricating properties of the oil, leading to increased wear and potential failure of moving parts.
- Maintaining Optimal Lubrication: Seals prevent the loss of essential gear oil. This oil reduces friction between the gears, dissipating heat and ensuring smooth operation. A compromised seal can lead to oil leakage, resulting in inadequate lubrication. Over time, this can increase wear and tear, leading to costly repairs or replacements.
- Preventing Contaminant Entry: Aside from water, seals also play a crucial role in keeping out dirt, debris, and other contaminants. These foreign particles can introduce abrasion to the internal components, further accelerating wear.
- Ensuring Peak Performance: A Yamaha outboard that retains its seal integrity operates at its best. Operating at peak performance ensures optimal fuel efficiency and maximum power transfer, prolonging the motor's overall life.
In essence, the integrity of the seals in the lower unit is foundational to the performance and longevity of the outboard motor. It's not merely about keeping water out; it's about ensuring a controlled environment where the intricate components of the lower unit can operate seamlessly. Regular checks, like the pressure test, become invaluable tools for recognizing and addressing potential issues before they escalate.
When Should You Conduct a Pressure Test on Your Lower Unit?
A lower unit pressure test isn't something you'll need to perform every time you use your boat, but knowing when to conduct one can save you from more extensive and expensive repairs down the line. When should you consider this vital checkup for your Yamaha outboard motor?
- Routine Maintenance Checks: Incorporate the pressure test into your annual or semi-annual maintenance routine. Regularly scheduled testing, even when there aren't any noticeable signs of issues, can detect potential problems early.
- After a Collision or Grounding: If your boat has hit an object underwater or run aground, it's crucial to check the lower unit for any damage. Even if there's no visible external damage, the impact might have affected the integrity of the seals.
- Noticing Performance Issues: If the outboard starts behaving erratically, such as producing unfamiliar noises, losing power, or experiencing vibrations, these could be signs of issues within the lower unit.
- Presence of Milky Gear Lube: When changing or checking the gear lube, a milky or cloudy appearance indicates water intrusion. A pressure test can help identify where the water is entering from.
- Oil Leakage: If you observe oil stains or spots beneath the outboard while it's parked or moored, it might be due to a failing seal. A pressure test can confirm the source of the leak.
- After Seal or Component Replacement: If you've recently replaced a seal, bearing, or any component in the lower unit, it's a good practice to conduct a pressure test to ensure that the replacement was successful and that there are no leaks.
- Purchasing a Used Boat or Outboard: Before finalizing a purchase, especially if it's a used boat or motor, conducting a pressure test can provide insight into the condition of the lower unit, ensuring you're not investing in potential hefty repairs.
Essential Tools and Materials for the Test
- Pressure gauge suitable for the task
- Pressure pump or hand pump
- Soapy water in a spray bottle
- Drain pan
A Step-by-Step Approach to Conducting a Yamaha Lower Unit Pressure Test
1. Preparation:
- Place the outboard in a vertical position.
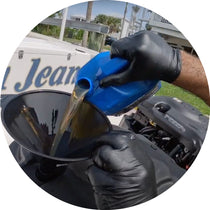
- Using the drain pan, completely drain the gear lube from the gear case. It's essential to ensure no gear lube is present as it can give inaccurate results.
- Inspect the gear lube for signs of water intrusion, which appear as milky or cloudy oil.
2. Set Up the Pressure Test Equipment:
- Attach the pressure pump to the fill hole. Some special adapters may be required depending on the Yamaha outboard model.
- Attach the pressure gauge to the pump or adapter.
3. Conducting the Test:
- Using the pressure pump, apply approximately 10-15 psi of pressure to the gear case. Consult your service manual for the specific pressure recommendation for your model.
- Once you've achieved the desired pressure, hold it steady for several minutes.
4. Inspecting the Seals:
- Spray the soapy water solution around the prop shaft seal, drive shaft seal, drain, and fill plug seals.
- Observe for any bubbles forming. Bubbles are a sign of air escaping, indicating a seal leak.
- Keep an eye on the pressure gauge during this time. A pressure drop also indicates a possible leak.
5. Interpreting Results:
- If bubbles form at any of the seals after spraying them with soapy water or if the pressure drops on the gauge, it indicates a potential leak at that location. That seal or component will need further inspection, repair, or replacement.
- The lower unit is sealed correctly if no bubbles form and the pressure remains steady.
6. After the Test:
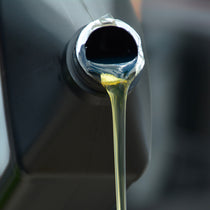
- Release the pressure from the gear case.
- Refill the lower unit with the appropriate gear lube as specified in your Yamaha outboard's service manual.
- Reinstall the drain and fill plugs, ensuring they are tightened to the specified torque settings.
Regularly checking the integrity of the lower unit seals can save you from more extensive and costly repairs down the line. Remember, water intrusion or loss of gear lube can lead to significant damage inside the gear case.
Final Thoughts: Navigating Lower Unit Pressure Testing
The pressure test conducted on the Yamaha lower unit is an indispensable procedure to ensure the optimal performance and longevity of the outboard motor. Subjecting the lower unit to controlled pressure allows for detecting potential leaks, cracks, or weaknesses. Addressing these issues proactively can prevent unwanted damage leading to motor inefficiency and failure.
The insights gained from the pressure test empower boat owners to make informed decisions regarding maintenance and repairs. Early issue identification and resolution save time and resources and enhance watercraft safety. Furthermore, a well-maintained lower unit improves overall performance and extends the outboard motor's operational life. Incorporating regular pressure tests into routine maintenance schedules is a prudent practice for any Yamaha outboard motor owner.
**Important Note**
Always consult your engine’s owner’s manual for instructions and information specific to your engine. If you need clarification on checking compression, consult a Yamaha-certified mechanic.
PartsVu and Platinum Mobile Marine Partnership
Huge thanks go to Frank Cutri, the owner and operator of Platinum Mobile Marine, a mobile mechanic service serving the Lee County, Florida area, for partnering with PartsVu on the Boat Maintenance Matters series.
Together, we are working hard to build a library of step-by-step instructions on common outboard motor repair and maintenance tasks.