Embarking on changing the impeller on your Yamaha outboard motor is a crucial maintenance step that ensures the longevity and efficiency of your engine. This DIY guide is designed to walk you through the process step by step, ensuring you can confidently perform this essential task. The impeller, a vital component of the engine's cooling system, requires regular inspection and replacement to prevent overheating and engine damage.
Whether you're a dedicated enthusiast or simply looking to expand your maintenance skills, this guide will provide the knowledge and techniques needed to successfully change the impeller on your Yamaha outboard.
In the video embedded within this article, the impeller replacement was performed on a Yamaha F200 outboard. However, the video and the step-by-step instructions included within this article apply to:
- F150
- F175
- F200
What You’ll Need for the Job
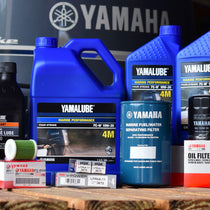
- Yamaha Water Pump Repair Kit
- Yamalube Marine Grease
- Screwdrivers
- Power Screwdriver
- Socket Wrench Set
- Mallet
- Chisel Set
- Rags
Why Changing an Impeller is Critical for Your Outboard Motor’s Cooling System?
The impeller on an outboard motor is part of the water pump, responsible for cooling the engine. Over time, the impeller wears down, cracks, or deforms, leading to poor water circulation and overheating.
Benefits of Regular Impeller Replacement:
- Prevents overheating and engine damage
- Ensures fuel efficiency by maintaining proper cooling
- Prolongs the lifespan of your outboard motor
- Reduces repair costs by avoiding major engine failures
Most manufacturers recommend changing an impeller every two to three years, or sooner if signs of wear appear—especially when using OEM Yamaha motor parts to ensure compatibility and reliability.
Signs of Potential Problems with the Impeller or Water Pump
To identify issues with your Yamaha outboard's impeller or water pump based on motor performance and other operational indicators, watch for these signs:
- Engine Overheating: A primary sign of a failing impeller or water pump is the engine running hotter than usual, which can potentially lead to overheating warnings.
- Decreased Water Flow from the Cooling System: If you notice a reduced flow of water exiting the cooling system, it could indicate a blockage or damage to the impeller.
- Unusual Noise from the Water Pump Area: Any new or unusual noises coming from the area of the water pump could signal a malfunction or debris caught in the impeller.
- Steam or Excessive Heat from the Engine While Running: Steam or noticeable heat emanating from the engine while in operation can be a symptom of inadequate cooling.
- Engine Performance Issues: Difficulty starting the engine, loss of power, or erratic performance might be linked to an inefficient cooling system caused by impeller or water pump problems.
- Visual Signs of Wear or Damage When Inspecting: Beyond performance, visual inspection can reveal damaged, worn, or broken impeller blades upon removal.
Tools and Materials Needed for Impeller Replacement
Having the right tools and materials to replace the impeller on your Yamaha outboard is crucial for a smooth and successful process. Here's what you'll need:
- New Water Pump Kit: Must match your Yamaha Outboard model.
- Marine Grease: Lubricates impeller and pump housing.
- Socket Wrench Set & Flathead Screwdrivers: For loosening/tightening tasks.
- Power Driver: Speeds up screw and bolt driving.
- Mallett: For tapping parts into place and removing/installing parts.
- Rags and paper towels: For cleaning and wiping tasks.
- Safety Glasses & Gloves: Protect eyes from debris and hands from cuts/abrasions.
Changing an Impeller: Step-by-Step Guide for Your Outboard Motor
Changing an impeller is a crucial maintenance task that keeps your outboard motor running smoothly by preventing overheating. Follow these step-by-step instructions to replace the impeller on an outboard motor:
Prepare Your Work Area
- Place the outboard motor in a stable position for easy access.
- Gather necessary tools, including a socket wrench, screwdrivers, marine grease, and a mallet.
Remove the Lower Unit
- Unscrew and detach the lower unit (gear case) from the motor.
- Keep all bolts organized for reassembly.
Remove the Old Impeller
- Locate the water pump housing and remove the securing bolts.
- Carefully slide the old impeller off the driveshaft.
- Inspect for damage, melting, or worn blades.
Install the New Impeller
- Apply marine grease to the shaft.
- Slide the new impeller onto the driveshaft.
- Reinstall washers, housing, and securing bolts.
Reassemble and Test
- Reattach the lower unit, ensuring all bolts are tightened properly.
- Start the outboard motor and check for proper water circulation.
Regularly changing an impeller ensures optimal engine cooling, preventing breakdowns and costly repairs.
Frequently Asked Questions
How often should you replace the impeller on an outboard motor?
The impeller on an outboard motor should be replaced every two to three years or sooner if signs of wear appear, such as reduced water flow or overheating.
What happens if you don’t change the impeller?
If you don’t change the impeller, it can wear out, crack, or break apart, leading to insufficient cooling, engine overheating, and potential engine failure.
How do I know if my outboard motor impeller is bad?
Signs that your outboard motor’s impeller is failing include engine overheating, weak water flow, unusual noises, or decreased performance.
Can I change an impeller myself, or should I hire a professional?
Changing an impeller is a manageable DIY task for most boat owners with basic tools. However, if unsure, consult a Yamaha-certified mechanic for guidance.
Final Insights: Ensuring Your Outboard's Longevity Through Impeller Care
Replacing the impeller on your Yamaha outboard is a key maintenance task that can significantly impact the performance and longevity of your engine. When changing an impeller, follow these step-by-step instructions for a smooth replacement process. Having the right tools and materials on hand, recognizing the signs of wear and damage, and understanding the importance of the water pump and impeller in your engine's cooling system are all critical components of this process.
Regularly changing an impeller on an outboard motor ensures proper cooling, prevents overheating, and extends engine life. Remember, properly caring for your Yamaha outboard will ensure it remains ready for your next boating adventure.
**Important Note**
Always consult your engine's owner's manual for instructions and information specific to your engine. For clarification on changing a water pump impeller, consult a Yamaha-certified mechanic.
PartsVu and Platinum Mobile Marine Partnership
Huge thanks go to Frank Cutri, the owner and operator of Platinum Mobile Marine, a mobile mechanic service serving the Lee County, Florida area, for partnering with PartsVu on the Boat Maintenance Matters series.
Together, we are working hard to build a library of step-by-step instructions on common outboard motor repair and maintenance tasks.