Yamaha anodes should be replaced when they are about 50% depleted or during annual service if corrosion is significant. Common locations include the trim tab, transom bracket, lower unit, propeller area, and internal engine anodes. Replacements should always be installed with clean metal-to-metal contact so they can protect the outboard from galvanic corrosion.
Understanding how and when to replace Yamaha outboard anodes is paramount for preserving the condition and lifespan of your Yamaha outboard motor. Anodes, or sacrificial anodes, are the front-line defenders against damaging electrolysis and corrosion. However, over time, they deteriorate and must be replaced to keep your engine in optimal condition.
Yamaha outboard anodes, including zinc, aluminum, or magnesium types, should be replaced when about 50% corroded. The right anode material depends on your boating environment, so always match the replacement anode to your engine, water type, and Yamaha’s recommendations.
This guide aims to simplify the process, providing clear instructions for identifying anode wear and carrying out an efficient replacement. In addition, it sheds light on the critical signals that indicate it’s time for anode replacement. Continue reading for valuable insights and detailed guidance to help you undertake this essential maintenance task.
In the video embedded within this article, the anode is replaced on a Yamaha F115. However, the video and the step-by-step instructions included within this article apply to:
What You’ll Need for the Job
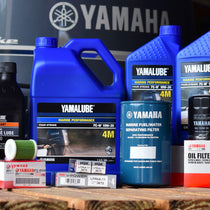
- Yamaha Outboard Anodes
- Wrench or Socket Set
- Screwdrivers
- Wire Brush or Sandpaper
The Significance of Anodes for Your Yamaha Outboard Motor
Anodes are critical to your Yamaha outboard motor’s overall health and performance. Their role is often overlooked, but your boat and motor can quickly deteriorate without them. Here are a few reasons why anodes are so important:
- Protection Against Corrosion: Yamaha outboard anodes are often called “sacrificial” because they are designed to corrode or wear away before your boat and motor’s metallic parts do. They are made of a less noble metal, such as zinc, magnesium, or aluminum. The anode corrodes first, helping protect more critical components from corrosion.
- Longevity of Your Yamaha Motor: By guarding against corrosion, anodes significantly extend your boat’s and outboard motor’s lifespan. Regular replacement of worn-out anodes can save you the expense of replacing more costly parts of your engine or even the entire motor.
- Performance Maintenance: Corrosion can lead to parts of your motor malfunctioning, which can affect the performance of your outboard engine. Anodes help maintain optimal performance by protecting these vital parts from corrosion damage.
- Safety: In severe cases, corrosion can cause critical outboard motor components to fail, posing potential safety risks. Anodes help to ensure the safe operation of your motor by reducing these risks.

Identifying the Right Time to Replace Your Yamaha Anodes
Understanding when to replace the anodes on your Yamaha outboard motor is key for its smooth operation and long life. There isn’t a universally fixed timeline, but Yamaha zinc anodes should generally be replaced once they are roughly half consumed to protect the outboard from galvanic corrosion.
- Visual Inspection: One of the most straightforward methods to determine if your anodes need to be replaced is through visual inspection. If an anode is about 50% depleted, significantly smaller than usual, or heavily corroded, it is usually time to replace it.
- Check for Physical Deterioration: Carefully run your hand over the anode’s surface. If it leaves a powdery residue on your hand or crumbles with slight pressure, the anode is worn down and is due for replacement.
- Regular Maintenance Checks: You should inspect anodes during every regular service, or at least once a year. Your anodes may require more frequent checks if the boat is used in harsher marine environments, kept in a slip, connected to shore power, or operated around other metal components.
Remember, replacing anodes on time is a relatively small investment compared to the costly repairs and replacements resulting from neglecting this crucial part of your Yamaha outboard motor’s maintenance.
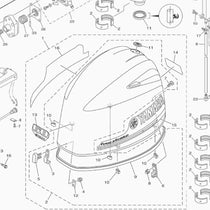
Where Are Yamaha Outboard Anodes Located?
Key areas to inspect include the trim tab, transom bracket, lower unit, propeller area, and internal block anodes. The exact number and location of anodes varies by Yamaha outboard model, so always compare your engine against the owner’s manual or parts diagram before ordering replacements.
- Trim tab anode: often located above or near the propeller and may also help offset steering torque.
- Bracket anodes: mounted around the transom or clamp bracket area to protect exposed metal components.
- Lower unit anodes: positioned around the gearcase or lower unit where corrosion exposure is common.
- Internal engine anodes: installed inside the cooling passages or engine block on many Yamaha outboards and often overlooked during routine maintenance.
When replacing any Yamaha anode, make sure the mounting surface is clean and bare so the anode has direct electrical contact with the engine. Do not paint the new anode, and reinstall any bonding wires or tethers exactly as removed.
Essential Tools for Anode Replacement on Your Yamaha Outboard Motor
Below is a list of tools that you’ll need to change the anodes on your Yamaha outboard motor:
- Yamaha outboard anodes
- Wrench or socket set
- Screwdrivers
- Wire brush or sandpaper
Step-by-Step Process to Replace Anodes on a Yamaha Outboard Motor
Step 1: Preparing for the Task
Start by assembling all the tools listed earlier and ensure your workspace is clean and well-lit. Confirm that you have the correct replacement anode for your Yamaha model and the correct anode material for your boating environment.
Step 2: Removing the Old Anode
Locate the old anodes on your boat. Then, select a wrench or socket set that is compatible with the anode bolts. Gradually loosen these bolts. Once you’ve adequately loosened the old anodes, carefully remove them.
Step 3: Cleaning the Installation Area
Once you remove the old anode, use a wire brush or sandpaper to carefully clean the area where the anode mounts. Cleaning helps ensure a good electrical connection. Remove corrosion, residue, paint, and buildup so the new anode has clean metal-to-metal contact with the engine.
Step 4: Installing the New Anode
Next, align the new anode with the mounting holes. Insert the bolts through the holes on the anode and tighten them. Be careful not to overtighten, as this could damage the anode. Never paint a new anode, since paint can block the electrical contact required for corrosion protection.
Step 5: Installing the Bonding Wire
Once your replacement anode is ready, you’ll need to attach the tether, also known as the bonding wire, if your Yamaha model uses one. This wire plays a crucial role in the functioning of the anode, creating a necessary connection for the anode to perform its job.
Step 6: Final Check and Testing
Conduct a final inspection to ensure everything is secure. Confirm that the anode is tight, unpainted, properly seated, and making direct contact with clean metal. If you replaced internal anodes, check for leaks after running the engine according to your manual’s instructions.
Yamaha Outboard Anode Replacement FAQs
When should Yamaha anodes be replaced?
Yamaha anodes should be replaced when they are about 50% depleted or during annual service if corrosion is significant. In harsh saltwater or marina environments, inspect them more often.
Where are Yamaha outboard anodes located?
Common Yamaha outboard anode locations include the trim tab, bracket, propeller area, lower unit, and internal engine anodes. Exact locations vary by model, so check your owner’s manual or parts diagram.
How do you replace Yamaha zinc anodes?
To replace Yamaha zinc anodes, remove the old anode, clean the mounting surface, install the new anode with clean metal-to-metal contact, reinstall any bonding wires, and avoid painting the new anode.
In conclusion, learning to replace the anodes on your Yamaha outboard motor is critical for maintaining your boat’s performance and longevity. This guide provides the necessary knowledge to undertake this maintenance task, regardless of mechanical experience. You can effectively manage this task with the right tools and steps, ensuring your motor remains tip-top.
**Important Note**
Always consult your engine’s owner’s manual for instructions and information specific to your engine. If you need clarification on replacing anodes, consult a Yamaha-certified mechanic.

PartsVu and Platinum Mobile Marine Partnership
Huge thanks go to Frank Cutri, the owner and operator of Platinum Mobile Marine, a mobile mechanic service serving the Lee County, Florida area, for partnering with PartsVu on the Boat Maintenance Matters series.
Together, we are working hard to build a library of step-by-step instructions on common outboard motor repair and maintenance tasks.