Maintaining the performance and longevity of your outboard motor is crucial for smooth operation and successful boating adventures. One vital aspect of proper maintenance is ensuring that the external anodes are regularly inspected and replaced when necessary. This guide will provide you with a step-by-step walkthrough of the process.
Regularly checking on these anodes is vital, especially if you frequently navigate saltwater environments or areas with a high concentration of minerals. Neglecting this maintenance task can lead to expensive repairs and reduce the overall lifespan of your outboard motor.
In the video embedded within this article, the external anode change was performed on a Mercury Verado 300. However, the video and the step-by-step instructions included within this article apply to:
- Verado L6 Models (200 – 400 HP)
This comprehensive guide will cover the necessary steps to replace Mercury external anodes. These steps will help you maintain your outboard motor’s optimal performance and protect your investment.
What You’ll Need for the Job


Why Are Anodes Important for an Outboard Motor?
Anodes play a crucial role in safeguarding your outboard motor from the damaging effects of corrosion. They serve as sacrificial components, sacrificing themselves to protect essential parts of the motor, such as the lower unit, propeller, seals, hull, and paint.
The primary purpose of external anodes, often referred to as sacrificial anodes or zincs, is to prevent galvanic corrosion. Galvanic corrosion occurs when different metals come into contact with an electrolyte, such as saltwater. This interaction creates an electrochemical reaction that can lead to the degradation of metal components.
By attaching sacrificial anodes to the motor, these anodes become the preferred target for corrosion. They are made from metals more prone to corrode, such as zinc or aluminum. As a result, the anodes corrode over time, protecting the more vital parts of the motor from corrosion.
Replacing the anodes on your outboard motor help to maintain its integrity and extend its lifespan. Without anodes, the boat’s metallic components could be vulnerable to corrosion, leading to reduced performance, increased maintenance costs, and potential damage.
Regular inspection and replacement of anodes are essential to ensure their effectiveness in corrosion protection. Over time, anodes will gradually wear away, indicating that they need to be replaced with new ones to continue providing optimal protection.

How to Tell if Your Anode Needs Replacing
Inspecting the anodes on your outboard motor is essential to ensure they effectively protect your motor from corrosion. Here are the steps to determine if your anodes need to be replaced:
- Visually inspect the anodes: Begin by visually examining the anodes on your outboard motor. Look for any signs of corrosion, such as a rough or pitted surface. If the anodes appear significantly corroded, they have been sacrificing themselves to protect your motor.
- Rub the anode with your hand: Gently rub your hand over the surface of the anode. If it leaves behind a dust-like residue or crumbles easily, it is a sign that the anode is deteriorating and needs to be replaced. This dust-like residue indicates that the anode is effectively sacrificing itself to protect the motor.
- Check for a significant size reduction: Compare the current size of the anodes to their original size. Anodes are designed to wear down over time as they protect your motor. If the anodes are significantly reduced in size compared to when they were new, it indicates that they have been working effectively. However, it also means they have reached their sacrificial limit and should be replaced.
By regularly inspecting and assessing the condition of the anodes on your outboard motor, you can determine when to replace them. Following these steps will help maintain the integrity and performance of your outboard motor, ensuring its longevity and reliability.
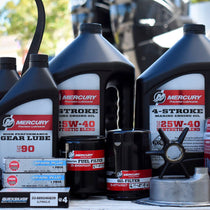
Essential Tools and Materials for Changing External Anodes
Before embarking on changing external anodes, gathering the necessary tools and materials is important. Here are the essential items you’ll need:
- Replacement anodes
- Mercury 2-4-C Grease
- Socket wrench set or appropriately sized wrench
Step-by-Step Guide to Changing the External Anodes
- Prepare for Anode Replacement: Position your outboard motor in a way that provides easy access to the anodes. If needed, turn the engine to work on the anodes on one side and then rotate the engine in the opposite direction to access the anodes on the other side.
- Remove the Old Anodes: Using the appropriate tools, carefully remove the old anodes from their designated locations. Removal may involve unscrewing or loosening bolts that secure the anodes in place. Loosen and remove the nuts and bolts, and attach each anode using a socket or wrench.
- Clean and Lubricate: Inspect the mounting surfaces and remove debris or corrosion. Apply Teflon grease (such as Mercury’s 2-4-C) where needed to add an extra layer of protection and lubrication.
- Install the New Anodes: Take the new Mercury outboard anodes and align them with the mounting holes. Start by hand-tightening the nuts onto the bolts to secure the anodes. Then, use a socket or the appropriate wrench to tighten them further. Ensure they are securely in place, but avoid overtightening to prevent damage.
- Monitor and maintain: Regularly monitor the condition of the external anodes and watch out for any signs of corrosion or damage. Follow the manufacturer’s guidelines for maintenance and replace the anodes as recommended.
By following these step-by-step instructions, you can effectively change the external anodes on your Verado L6 outboard motor, protecting critical components and extending your engine’s lifespan.
Conclusion: Maintaining Corrosion Protection for Your Mercury Verado Outboard Motor
Changing your Mercury outboard external anodes is a crucial maintenance task that helps protect your motor from corrosion and extend its lifespan. By following the step-by-step guide outlined above, you can easily replace the old anodes with new ones, ensuring the continued effectiveness of the corrosion protection system. Regularly monitoring and maintaining the anodes will help keep your outboard motor in optimal condition, allowing you to enjoy a smooth and reliable performance on the water.
**Important Note**
Always consult your engine’s owner’s manual for instructions and information specific to your engine. For clarification on changing external anodes, consult a Mercury Marine-certified mechanic.
PartsVu and Platinum Mobile Marine Partnership
Huge thanks go to Frank Cutri, the owner and operator of Platinum Mobile Marine, a mobile mechanic service serving the Lee County, Florida area, for partnering with PartsVu on the Boat Maintenance Matters series.
Together, we are working hard to build a library of step-by-step instructions on common outboard motor repair and maintenance tasks.