Getting your Mercury outboard ready for spring takes more than just a quick turn of the ignition. Proper preparation makes the difference between a great day on the water and potential problems that could have been avoided. This guide covers the essential maintenance tasks Mercury owners should complete before their first trip of the season.
Pre-Launch Fluid and System Verification
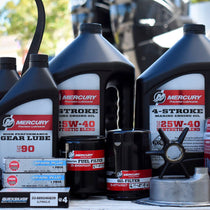
Before you start your engine, a thorough fluid check is essential. Even if you properly winterized your engine with fuel stabilization and performed a complete service before storage, winter conditions can create unexpected issues that need your attention.
Fuel System Inspection and Maintenance
Your fuel system requires careful attention after months of storage. Contaminated fuel is one of the most common causes of poor engine performance during spring launch.
- Disconnect the fuel supply line. Start by getting a fuel sample. Use a clear glass container so you can see what you're working with
- Check the fuel in good light. Look for water settling at the bottom, suspended debris, or a darker color that points to aging fuel
- Inspect the full length of the fuel hose, especially bends and connection points. Replace any section that feels brittle or shows cracks, soft spots, or surface checking
- Check every hose clamp and fitting for tightness and corrosion. Re seat and tighten as needed
- Inspect the fuel line hardware and any priming component your setup uses for cracks, swelling, or stiffness that suggests age or failure
- Reconnect the fuel line, confirm a tight seal at every connection, then prime the system the normal way for your engine so the fuel side is charged before start up
A clean fuel system is the foundation of reliable engine performance. Don't skip these critical checks.
Engine Oil Level Assessment
Your engine oil tells a story about what happened during storage. Check the oil level carefully using the dipstick. If the level appears significantly overfull, this could indicate water contamination in the oil tank—a serious issue that requires immediate attention before you attempt to start the engine.
Lower Unit Gear Lube Verification
Even if you serviced your lower unit immediately before winter storage, it's worth double-checking. If you didn't thoroughly "burp" excess air from the lower unit during the fill process, there may be room for additional lubricant after months of settling. More importantly, this gives you another opportunity to verify that no water has infiltrated the gear case during the off-season. Milky or contaminated gear lube indicates a failed seal that must be addressed before launch.
Battery and Electrical System Restoration
Your electrical system needs to be in good shape for dependable starts and smooth engine operation. Since most boaters pull their batteries for winter, spring is the perfect time to check everything over before you reconnect.
Marine Battery Inspection and Preparation
Your marine battery is a critical component that deserves careful attention. Before reinstallation, you should conduct a thorough inspection.
- Visual inspection: Check the battery case for any bulging, warping, or caved-in areas on the sides
- Check for leakage: Fluid leaks or crusty buildup around the terminals mean you're dealing with hazardous material
- Corrosion assessment: White, blue, or green crud around the connections is corrosion that needs cleaning
- Age verification: Marine batteries typically last approximately three years with proper maintenance—consider replacement if your battery is at or beyond this age
- Wet cell battery service: If you have traditional wet cell batteries, check and adjust fluid levels following the manufacturer's specifications, using appropriate protective gear when working with battery acid
Terminal Cleaning and Proper Connection
Clean both the battery terminals and cable ends using a terminal brush before reinstallation. The dissimilar metals in ring terminals, cable ends, and terminal studs naturally promote corrosion, so applying a corrosion inhibitor after connection is essential. Don't forget to properly tighten your battery hold-downs—vibration is a leading cause of premature battery failure.
Complete Electrical System Check
With the battery installed and charged, perform a complete systems verification. Go through the dash and flip each switch one by one. Confirm the device actually runs, not just that the switch clicks. It is an easy way to catch a weak pump, a dead light, or a loose connection while you are still in the driveway.
Navigation and anchor lights deserve extra attention after storage. Older bulb styles can corrode at the base and lose contact. Pull the lens, inspect the socket, and clean the contacts lightly. If you want a long term improvement, LEDs are a solid upgrade. They run brighter, handle vibration better, and pull less power from the battery.
Hull and Exterior Preparation
Your boat's exterior has been exposed to months of storage conditions and requires attention before launch. Starting with proper cover removal sets the stage for thorough preparation.
Boat Cover Removal and Maintenance
Before you prep your boat cover for storage, give it the attention it deserves. Clean the fabric using a soft brush and canvas-friendly cleaner. Inspect for broken snaps and replace them using a snap tool—a worthwhile investment for any boat owner. Lubricate the remaining snaps and zippers with a snap stick. Consider washing the canvas while it's still installed on the boat, then allow it to dry thoroughly before storage. Cleaning the cover helps preserve its shape and makes installation easier next season.
If you used shrink wrap, remove heavy tape residue from the hull with a solvent that won't damage the gelcoat. This same product works well for brightening white vinyl rub rail inserts or trailer PVC guide posts.
Comprehensive Walk-Around Inspection
With the cover removed, conduct a careful visual inspection of your entire vessel. Look for any issues that may have developed during storage.
- Check the ground beneath the boat for fluid leaks, including engine oil, gear lube, trim fluid, or gasoline
- Inspect the drain plug area for algae presence, which indicates the hull has been slowly weeping water
- Examine thru-hulls at and below the waterline—intake grates can be crushed from beaching, trailers, forklifts, or lifting slings
- Check plastic thru-hull fittings for age-related cracking and UV damage, especially critical for boats that remain in the water year-round
- Verify that crushed intake grates haven't reduced water flow to critical cooling or sanitation systems
Addressing these issues before launch prevents problems that could strand you on the water or cause equipment damage.
UV Protection and Surface Care
Spring launch presents an excellent opportunity to protect your investment from damaging UV rays. If your hull appears chalky, applying a polishing compound before waxing will restore a brilliant shine.
Fiberglass Hull Care and Protection
Polishing compounds work best when applied with a high-speed buffer, working small sections at a time. Always follow with a wax application to seal the surface. After completing the waxing process, wash the boat again to knock down the static charge created by all that rubbing—this prevents dust from adhering to your freshly polished surfaces.
Upholstery and Vinyl Protection
Your boat's upholstery is constantly exposed to UV light and environmental contaminants. Marine upholstery is often sewn with cotton thread that's highly sensitive to bleach, so you should avoid using harsh household cleaners. When you discover mold or mildew on vinyl after removing the cover, start with a marine-specific vinyl cleaner. When used correctly with a soft brush, microfiber rag, and melamine foam sponge, these products lift dirt and light staining without damaging delicate vinyl surfaces. Your vinyl should feel soft and supple—if it's stiff or cracking, it needs conditioning. Apply a quality protectant to keep your vinyl conditioned and looking its best throughout the season.

Safety Systems and Bilge Verification
Your boat's safety systems are critical equipment that must function flawlessly. Spring commissioning is the ideal time to verify everything works properly.
Bilge Pump and Float Switch Testing
Float switches and bilge pumps represent your first line of defense against water intrusion. Proper testing ensures they'll work when you need them.
- Verify automatic operation: Properly wired float switches should function with or without the battery switch being on
- Test manual override: Most boats allow the operator to manually toggle the bilge pump—confirm this backup method works
- Inspect discharge plumbing: Check bilge wiring, discharge hose, hose clamps, and thru-hull fittings for deterioration
- Check for multiple pumps: Many boats have multiple bilge pumps in different locations—test each one individually
- Listen for unusual noise: Grinding or labored sounds indicate impeller damage or bearing failure
A functional bilge system can prevent a minor leak from becoming a catastrophic sinking. Don't overlook this critical safety check.
Fresh Water System Recommissioning
If you winterized your freshwater system with antifreeze, you'll need to flush it out before using it. Fill the tanks and run fresh water through all the lines until the antifreeze is completely gone. Follow the disposal instructions on the antifreeze container.
Consider using a freshwater system cleaner to flush the lines and eliminate any remaining antifreeze taste or residue, ensuring your water system is clean and ready for the season.
Pest Inspection and Cowling Removal
Before you start your engine, take a few minutes to ensure Mother Nature hasn't made a home in your boat during storage. Remove your cowling and begin with a thorough visual inspection. From birds nesting inside the cowling's air intake to mud dauber wasps constructing elaborate nests to ants invading wiring harnesses, unwanted guests have no place inside your engine. Use a flashlight to inspect inside your propeller hub and the exhaust pathway, or remove the prop entirely if this area wasn't sealed during storage. Finding and removing nests now prevents overheating, electrical issues, and blocked airways.
Engine Flushing and Initial Start Procedure
With all pre-checks completed, you're ready for the critical first start of the season. Proper flushing technique protects your engine and provides valuable diagnostic information.
Flush Setup and Connection
Proper flushing requires the right equipment and technique. If you've never run your engine on a flush attachment, consult your owner's manual for model-specific instructions.
- Verify flush attachment fit: Ensure your motor flusher properly fits your specific lower unit design
- Remove intake screens: Take out the lower unit intake screens for optimal water pickup during flushing
- Connect water supply: Attach the garden hose and verify full water flow before proceeding
- Engine position: From the helm, trim the outboard down into its normal running position
- Clearance check: Verify the stern area and prop zone are clear of people, lines, and any loose gear
Starting Procedure and Monitoring
Put the control in neutral and clip on the safety lanyard. Turn the key to the run position without starting the engine. Let the gauges power up, then take a quick look at the voltage reading. If it looks low for a fully charged battery, charge the starting battery first and sort it out before you move on. Start the engine and allow it to idle while listening carefully for any abnormal noise or vibration. Verify that all gauges function properly, and the engine charges the onboard battery during operation. Check for adequate water flow from both the exhaust and the tell-tale stream.
If the engine runs properly during the flush, shut it down and recheck the engine oil level after allowing it to sit for several minutes. Oil levels can change after initial operation. Reinstall the cowling, remove the flush equipment, and you're ready to head to the ramp!
Comprehensive Trailer Preparation and Inspection
Your trailer deserves the same attention as your boat. A well-maintained trailer ensures safe transport and prevents roadside emergencies.
Before you hook up and head to the launch ramp, complete a thorough trailer inspection. These straightforward steps prevent problems and ensure safety.
- Lighting system verification: Test all trailer lights, including running lights, brake lights, and turn signals
- Tire pressure check: Verify inflation on all tires when they're cold, as heat from driving will increase pressure
- Tread depth assessment: Insert a penny upside down in the tread—if Lincoln's head is visible, replacement is needed
- Sidewall inspection: Look for cracks, bulges, or weather checking on the tire sidewalls
- Age verification: Check the DOT date code—trailer tires should be replaced every 5-7 years regardless of tread depth
- Brake functionality test: Drive around briefly with several stops—hot hubs or rotors indicate working brakes
- Brake battery check: If equipped, connect the brake battery to a charger and verify proper operation
- Wheel bearing service: Check and lubricate wheel bearings according to the manufacturer's specifications
- Lug nut torque: Check and tighten lug nuts in a star pattern to the proper specification
- Winch strap inspection: Examine the winch strap and tie-downs for fraying, tearing, or dry rot—replace if questionable
- Winch maintenance: Clean with a solvent-based cleaner and apply appropriate winch grease to all moving parts
- Tongue jack lubrication: Apply grease to the tongue jack mechanism for smooth operation
- Hitch lock verification: Ensure your trailer hitch lock functions properly and provides security
- Safety chain check: Verify chains are intact, properly crisscrossed under the tongue, and free from excessive rust
- Wiring harness care: Inspect trailer wiring and spray contacts with dielectric grease to prevent corrosion
- Roller and bunk inspection: If equipped with rollers, check for rust or cracking; verify bunk carpeting is intact and bunks are secure
- Coupler verification: Ensure the hitch latch closes securely and the ball matches the coupler size
- Ball mount security: Before each trip, verify the pin securing the ball mount to the receiver is properly installed
- Registration confirmation: Confirm your trailer registration is current and properly displayed
These comprehensive trailer checks might seem extensive, but they prevent breakdowns and ensure your valuable boat arrives safely at the launch ramp and returns home without incident.

Final Pre-Launch Preparations
You've completed the major systems checks, fluids verification, and safety inspections. Now it's time for the finishing touches that ensure a successful launch day.
Documentation and Safety Compliance
Verify your boat registration is current and properly displayed. Check that all required safety equipment is aboard and in serviceable condition, including life jackets, throwable flotation devices, fire extinguishers, visual distress signals, and sound-producing devices. Make sure your boat's documentation matches current state and federal requirements for your waterway.
Final Walk-Around Before Launch
Complete one last inspection of your boat and trailer. Verify the drain plug is installed. Confirm all loose items are secured. Check that coolers, fishing gear, and personal belongings won't shift during transport. Make certain your trailer is properly attached to the tow vehicle with both the coupler latched and safety chains connected.
Conclusion: Ready for the Water
By working through this Mercury spring launch checklist, you've covered everything from fluids and electrical systems to trailer safety. Yes, it takes some time, but it beats dealing with breakdowns on the water.
The hours you put in now mean reliable starts and smooth running all season long. Your Mercury is prepped, your trailer is road-ready, and your boat is launch-ready. Time to hit the water and enjoy what you came for—great days of boating!