Regular maintenance of your Yamaha Outboard engine is key to keeping it running smoothly. An essential part of this maintenance is replacing the drive shaft seals when needed. Worn-out seals can lead to oil leaks and other serious engine problems. This guide provides a straightforward, step-by-step process for replacing these seals on Yamaha Outboards. From the tools and materials required to the specifics of removing old seals and inserting new ones, this guide covers it all. Follow along to keep your Yamaha Outboard engine in top shape and ensure reliable performance on the water.
The video and the step-by-step instructions included within this article apply to:
- F115
- VF115
- F150
- VF150
- F175
- F200
- VF200
- F225
- VF225
- F250
- VF250
- F250 3.3L V6
- F300 4.2L V6
What You’ll Need for the Job
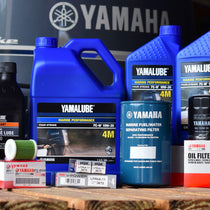
- New Yamaha Outboard Drive Shaft Seals
- Yamalube Marine Grease
- CRC 6-56
- Socket Set
- Flathead Screwdriver
- Small Wrenches
- Brush
- Mallet
- Hammer and Chisel
- Clean Rags
Why Should You Replace Drive Shaft Seals on Your Yamaha Outboard?
Replacing drive shaft seals on your Yamaha outboard is crucial for maintaining performance and preventing serious mechanical issues. Over time, these seals can wear out or get damaged, leading to oil leaks that can harm other engine components, cause a loss in engine efficiency, and result in costly repairs.
A faulty shaft seal can allow water and contaminants to enter the drive shaft area, causing further damage and potentially leading to engine failure. Regular inspection and timely replacement of these seals ensure that your outboard engine continues to operate efficiently, protecting your investment and ensuring your safety and reliability on the water. Proper maintenance of the shaft seals also helps prevent unexpected breakdowns, saving you time and frustration in the long run.
When is the Right Time to Replace the Drive Shaft Seals?
Determining the right time to replace the drive shaft seals on your Yamaha outboard is essential for maintaining uninterrupted and efficient engine performance. Here are some indicators that it might be time for a replacement:
- Visible Damage or Wear: Regularly inspect the seals for any visible signs of damage or aging. Noticeable wear or deformation are clear signs that the seals need replacement.
- Oil Leaks: Oil leaking around the drive shaft area indicates that the seals are failing and need immediate attention.
- Performance Issues: Experience with reduced engine performance or efficiency may also signal that the drive shaft seals are worn out or damaged.
- Scheduled Maintenance: Even without visible issues, replacing the drive shaft seals as part of your Yamaha outboard’s regular maintenance schedule is a good practice. Consult your engine's manual for the manufacturer-recommended replacement intervals.
Essential Tools and Materials for Replacing Yamaha Outboard Drive Shaft Seals
- New Drive Shaft Seals: Ensure they are specific to your Yamaha outboard model.
- Yamalube Marine Grease
- CRC 6-56: Used for cleaning the various parts in the process.
- Socket Set: For removing and attaching bolts.
- Flathead Screwdriver: Used for cleaning grime, prying out seals, and aiding in the removal of the carrier.
- Small Wrenches: Wrenches can also be used to pry out seals.
- Brush: Useful for clearing away debris from the assembly.
- Mallet: Assists in the removal of old seals from the carrier.
- Hammer and Chisel: Essential for loosening a tightly seated carrier.
- Suitably Sized Socket: Helps to seat the new seals evenly.
- Oil Seal Cover: This crucial component prevents leaks and damage.
- Clean Rags or Cloth: This helps remove grease or debris.
Yamaha Outboard Maintenance: How to Replace Drive Shaft Seals
1. Preparation:
- Secure the Motor: Make sure the outboard motor is securely mounted to avoid movement.
- Gather Necessary Tools: Have all the needed tools and materials ready.
- Remove the Propeller: Remove the propeller to access the lower unit.
- Detach the Lower Unit: Remove the lower unit to reach the drive shaft.
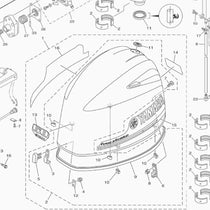
2. Access the Seals:
- Loosen the Cap: Use a mallet and chisel to gently tap the cap to loosen it from the drive shaft.
- Remove the Woodruff Key: Take out the Woodruff key carefully to avoid damage. Replace when done.
- Remove the Cap: Once it's loose, remove the cap.
- Take Off the Oil Seal Cover: Remove the oil seal cover to access the carrier.
3. Remove the Carrier:
- Unscrew the Carrier: Take out the screws holding the carrier in place.
- Rotate the Carrier: Lightly tap the carrier with a mallet and chisel to turn it counterclockwise.
- Pry the Carrier if Stuck: If it's still stuck, use two flathead screwdrivers or small wrenches on opposite sides to pry the carrier out evenly.
- Access the Drive Shaft Seals: After removing the carrier, you can get to the drive shaft seals.
4. Remove the Old Seals:
- Tap Out the Seals: Gently tap the seals out from the carrier with a mallet and flathead screwdriver. Make sure not to damage the housing.
- Note the Seal Orientation: Remember the orientation and order of the seals for proper replacement, as some Yamaha models have specific sequences.
5. Clean the Area:
- Clean the Seal’s Seat: Clean the area where the seals sit, removing any salt, corrosion, or other debris.
- Smooth the Area: To avoid damaging the new seals, smooth the area.
- Use a Cleaner: Spray a cleaner like CRC 6-56 to finish cleaning and handle any salt and corrosion.
- Replace the Dowels: Don't forget to replace the old dowels with new ones.
6. Inserting the New Seals:
- Put in the First Seal: Press the first seal into position (face up) using your thumb.
- Tap Seals if Needed: If you need more force, gently tap the seals with a socket and mallet to make sure they're in place.
- Place the Second Seal: Put the other seal on top.
- Secure the Second Seal: Press the second seal into place using a socket.
- Check the Seals: Make sure both are evenly placed and not out of shape.
7. Reassemble:
- Put Back the Carrier: Put the carrier back in the same position as before, ensuring it is evenly aligned on both sides.
- Secure the Carrier: Fasten the carrier with its bolts. Grease the bolts with Yamalube Marine Grease and secure them in place.
- Put Back the Oil Seal Cover: Reattach the oil seal cover.
Consistent care and attention to your outboard engine’s components prevent more significant issues, safeguarding your investment and guaranteeing smooth and reliable operations on the water. Make drive shaft seal replacement a part of your regular maintenance routine to enjoy uninterrupted boating adventures and the enduring performance of your Yamaha Outboard engine.
**Important Note**
Always consult your engine’s owner’s manual for instructions and information specific to your engine. If you need clarification on performing an oil change, consult a Yamaha-certified mechanic.
PartsVu and Platinum Mobile Marine Partnership
Huge thanks go to Frank Cutri, the owner and operator of Platinum Mobile Marine, a mobile mechanic service serving the Lee County, Florida area, for partnering with PartsVu on the Boat Maintenance Matters series.
Together, we are working hard to build a library of step-by-step instructions on common outboard motor repair and maintenance tasks.