In the world of boating, the impeller stands as a silent sentinel, pivotal to the cooling system of your Yamaha Outboard engine. This small yet mighty component ensures that water circulates through the engine to keep it cool during operation, preventing overheating and potential damage. Understanding the role of the impeller, along with timely maintenance, is essential for every boat owner who wants to enjoy seamless voyages and extend the lifespan of their engine.
However, like all mechanical parts, the impeller is subject to wear and tear and requires regular inspection and replacement to maintain optimal performance. This article explores the significance of the impeller and guides you through inspecting and replacing this crucial component.
In the video embedded within this article, the anode replacement was performed on a Yamaha F115 outboard. However, the video and the step-by-step instructions included within this article apply to:
- F90
- F115
- VF115
What You’ll Need for the Job
- Yamaha Water Pump Repair Kit
- Yamalube Marine Grease
- Screwdrivers
- Power Screwdriver
- Socket Wrench Set
- Mallet
- Chisel Set
- Rags
The Heart of the Cooling System: Understanding Your Impeller's Role
The impeller in your Yamaha Outboard is akin to the heart in the human body—pumping water through the engine to cool it down during operation. This crucial component is nestled within the lower unit of the engine, out of sight but significantly impacting your boating experience. Its role cannot be overstated:
- Vital for Cooling: It draws water from the surrounding environment and circulates it through the engine's cooling channels.
- Prevents Overheating: Without it, the engine would overheat, leading to damage and costly repairs.
- Efficiency and Performance: A well-functioning impeller ensures optimal engine performance and fuel efficiency.
How Often Should I Inspect and Replace My Impeller?
Regular inspection and timely replacement of your Yamaha Outboard's impeller are essential for maintaining the engine's health and performance. While the frequency of inspection and replacement can vary, adhering to a maintenance schedule is crucial for ensuring your engine remains in top condition.
Recommended Inspection Intervals:
Most professionals recommend inspecting the impeller annually, particularly before the onset of the boating season. Although the impeller may appear in good condition, replacing it annually or after every 100 hours of operation is wise to prevent degradation over time and use. However, check your Yamaha owner's manual for specific information regarding your model, as recommendations can vary.
Signs That It's Time to Replace:
- Decreased Water Flow: A weaker stream of water exiting the outboard could indicate that the impeller is not pumping water efficiently.
- Overheating Engine: This indicates that the cooling system may be compromised, often due to a worn or damaged impeller.
- Visible Wear and Tear: If you notice cracks, missing pieces, or significant wear on the impeller blades, it's time for a replacement.
Essential Tools and Materials: Preparing for Impeller Replacement
Replacing the impeller of your Yamaha Outboard is a straightforward task when you have the right tools and materials. Before you begin, ensure you've gathered all the necessary items to make the job smooth and safe. Here's a comprehensive list:
Basic Tools:
- Flathead Screwdrivers: Essential for various tasks.
- Socket Wrench Set: Used to loosen and tighten bolts effectively.
- Mallet: Useful for tapping components into place.
- Chisel Set: Needed to remove and install certain parts.
- Power Driver: Speeds up the process of driving screws and bolts.
Materials:
- New Yamaha Water Pump Kit: Ensure it's the correct model for your Yamaha Outboard.
- Yamalube Marine Grease: To lubricate the impeller and the inside of the pump housing.
- Rags: for cleaning and general use.
Safety Equipment:
- Gloves: To protect your hands during the replacement process.
- Safety glasses: To shield your eyes from any debris or accidental splashes.
Step-by-Step Guide: Replacing Your Yamaha Outboard's Impeller
Maintaining the water pump on your Yamaha Outboard is crucial for its proper functioning. Here's a streamlined step-by-step guide on changing the water pump impeller:
1. Remove the Lower Unit (Gear Case)
- Place the lower unit in a suitable workspace for easy access throughout the process.
2. Remove Old Water Pump Assembly
- Remove bolts securing the housing.
- Gently pry off the housing, attempting to leave the cup in place.
- Remove old O-rings.
- Inspect the housing for signs of melting or damage. Replace if necessary.
- Carefully remove the collar over the cup housing using a flathead screwdriver.
- Slide the collar and metal impeller housing off the shaft.
- Remove the washers that hold the impeller in place over the plate. Note the orientation of the two flat washers and the wave washer. The flat washers sandwich the wave washer.
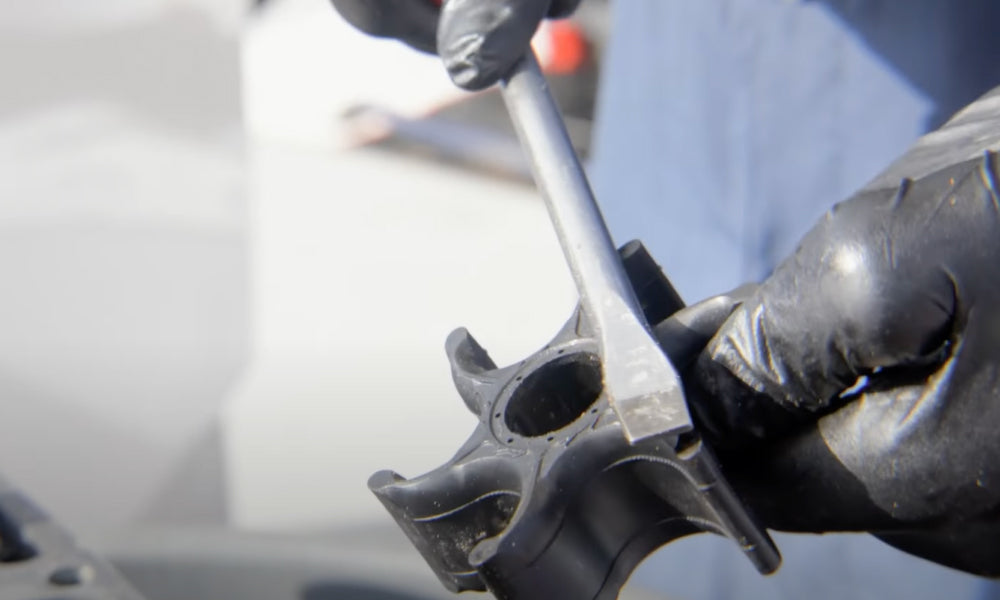
- Remove the impeller by sliding it up and off of the shaft.
- Examine the impeller for signs of overheating, such as melting.
- Use a stout chisel to remove the metal key.
- Remove the impeller plate and oil seal cover.

3. Preparation for New Impeller
- Clean and prepare the surface, ensuring no debris or old gasket material remains.
4. Installing the New Water Pump Kit
- Slide the new oil seal cover over the shaft.
- Insert metal mounting tabs by gently tapping them into place with a mallet.
- Ensure the seal sits snugly in its proper position.
- Position the new gasket, aligning screw holes.
- Install the new metal plate, aligning it using screw holes.
- Insert the small metal key into the shaft above the metal plate. Use a mallet and blunt chisel to punch the key into place securely until it is flat and flush.
- Slide the new impeller onto the shaft.
- Install the flat washer/wave washer sandwich. Tap the washers into place using a wrench and mallet.
- Apply 2-4-C grease inside the plastic housing before installing the O-ring.
- Install the O-ring and then the new metal cup into the plastic housing.
- Apply more grease to the housing before installing the large O-ring.
- Slide the plastic housing back over the shaft.
- Use a rag to hold the shaft. Rotate the shaft clockwise while pushing down to ensure the housing locks into place.
- Reinstall the bolts securing the housing.
- Generously apply grease onto the shaft before reinstalling the lower unit.
Replacing the impeller on your Yamaha Outboard is a critical maintenance task that ensures your engine remains in peak condition, preventing overheating and potential damage. You can effectively tackle this task by following the detailed steps outlined—from disassembly and inspection to the final testing.
Remember, the key to a successful impeller replacement lies in meticulous attention to detail, proper use of tools and materials, and adherence to safety practices. Regular inspections and timely replacements will extend your Yamaha Outboard's lifespan and enhance your boating experience with reliable performance. Don't overlook the importance of consulting your owner's manual for model-specific guidelines, and consider seeking professional assistance if you encounter challenges. With the right approach, replacing an impeller can be a straightforward and rewarding aspect of outboard maintenance, ensuring many more enjoyable days on the water.
**Important Note**
Always consult your engine's owner's manual for instructions and information specific to your engine. For clarification on changing a water pump impeller, consult a Yamaha-certified mechanic.
PartsVu and Platinum Mobile Marine Partnership
Huge thanks go to Frank Cutri, the owner and operator of Platinum Mobile Marine, a mobile mechanic service serving the Lee County, Florida area, for partnering with PartsVu on the Boat Maintenance Matters series.
Together, we are working hard to build a library of step-by-step instructions on common outboard motor repair and maintenance tasks.


1 comment
how to get lower unit separated in the case of a motor used in Salt water
———
PartsVu replied:
Hi Bryan,
Saltwater use can cause corrosion that makes separating the lower unit more difficult. In many cases, the bolts or driveshaft can seize due to salt buildup, so applying a penetrating lubricant and allowing it to soak can help. Gentle tapping with a rubber mallet around the seam (never on sensitive parts) may also assist in loosening it. That said, we are not mechanics, and if you’re unsure or run into resistance, it’s best to have the process supervised or performed by a qualified marine mechanic to avoid damaging components.
Best Regards Markine