Getting your Yamaha outboard ready for the upcoming season involves far more than reconnecting a battery and hoping for the best. Months of inactivity allow small, easily overlooked issues to develop quietly. Rubber components stiffen. Fluids separate or absorb moisture. Electrical connections begin to oxidize. None of these problems announce themselves immediately, but they have a way of surfacing at the worst possible moment, often at the ramp or shortly after leaving the dock.
A thorough preseason preparation process gives you a clean starting point. It confirms that your Yamaha outboard, supporting boat systems, and trailer are all operating the way they should before you rely on them. Taking a methodical approach now reduces the chance of preventable failures later and makes your first trip of the season boring in the best possible way.
Uncovering the Boat and Initial Setup
Once weather conditions allow full access to the boat, begin by removing any covers or shrink wrap and taking a few minutes to evaluate how the boat handled storage. Boat covers are often ignored during spring prep, but they protect some of the most expensive surfaces on the boat and deserve attention before being folded up and stored.
Before putting the cover away, inspect it carefully:
- Look for broken, loose, or missing snaps and address them before they tear fabric
- Lubricate snaps and zippers so they operate smoothly and resist corrosion
- Check seams, corners, and low spots where water may have pooled during storage
Cleaning the cover while it is still installed on the boat allows it to dry in its natural shape, which helps prevent shrinkage and distortion. This also makes reinstalling it later in the season easier. If shrink wrap was used, remove any tape residue from the hull and inspect areas where the wrap contacted gelcoat, rub rails, or trim. These areas often trap moisture and grime. This is also a good time to clean and inspect rub rails, guide posts, cleats, and other exposed hardware that may have been neglected during the off-season.
Walk-Around Inspection
With the boat uncovered, perform a slow and deliberate walk-around inspection. This initial step helps establish a baseline and makes it easier to spot obvious issues before moving on to more detailed system checks.
Pay close attention to:
- Any fluid beneath the boat, including engine oil, gear lube, trim fluid, or fuel
- Evidence of slow water leaks near the drain plug, often shown by algae or staining
- Thru-hull fittings at or below the waterline that may be cracked, distorted, or loose
- Intake grates that could restrict water flow if bent or crushed
Plastic thru-hull fittings deserve extra scrutiny. Over time, UV exposure and age can cause fittings to become brittle. Small cracks that are harmless on the trailer can become serious once the boat is floating. Catching these issues early helps avoid water intrusion and the damage that follows.
Protecting the Boat from Sun and Weather Exposure
The start of the season is the ideal time to restore and protect exterior surfaces before the boat sees extended sun exposure. If the hull appears dull, chalky, or uneven in color, polishing before waxing can dramatically improve appearance and protection.
When working on exterior surfaces:
- Work in small sections to maintain even results
- Always apply wax after polishing to seal the finish
- Wash the boat again after waxing to reduce static buildup and prevent dust from sticking

Don't overlook the upholstery. While marine-grade vinyl is built for the elements, it’s not invincible against UV rays, abrasive cleaners, or general neglect. Using standard household soaps can actually do more harm than good—stripping the vinyl of its oils and weakening the threads, which leads to cracked surfaces and split seams long before their time.
For upholstery care:
Vinyl does not need aggressive cleaning. A marine-safe cleaner made for outdoor use is usually enough. Work it in lightly with a soft brush or a microfiber cloth and let the product do the work. On textured areas, foam sponges tend to clean more evenly without scuffing the surface. Once everything is clean, a protectant helps keep the material flexible and slows down sun damage over time.
Battery and Electrical System Check
Batteries and electrical systems are often the first things affected during storage. Shifting temperatures, lack of use, and constant vibration can cause wear that builds quietly and goes unnoticed.
Before reconnecting batteries:
- Inspect for swelling, leakage, or corrosion
- Treat any residue as hazardous and neutralize it before handling
- Consider battery age carefully, as most marine batteries provide reliable service for only a limited number of seasons
If you’re running wet cell batteries, keep an eye on the electrolyte levels. Top them off following the manual’s specs, and definitely wear gloves and eye protection—battery acid isn't something to mess with. It’s also a good idea to give them a full charge before they go back in the boat; that way, you’ve got steady power when you start testing your systems.
When reinstalling batteries:
- Clean battery terminals and cable ends thoroughly to remove corrosion and buildup
- Apply corrosion protection to all electrical connections
- Confirm battery hold-downs are tight, since vibration is a common cause of early battery failure
Electrical Systems Function Test
With power restored, test every electrical circuit before launching the boat.
This includes:
- Cycle all switches to confirm pumps, lights, and accessories respond correctly
- Test navigation and anchor lights individually
- Inspect bulb contacts and sockets for corrosion or looseness
- Watch for delayed, flickering, or intermittent operation
Older lighting systems are more susceptible to corrosion after extended periods of inactivity. Catching and correcting these issues early helps avoid visibility problems during early-morning departures or low-light operation.
Bilge Pumps, Float Switches, and Freshwater Systems
Bilge pumps and float switches are safety-critical components and should always be tested directly rather than assumed to be working.
Verify that:
- Float switches activate pumps automatically
- Pumps can also be activated manually from the helm
- Wiring, hoses, clamps, and thru-hulls are secure and in good condition
- All pumps run smoothly without hesitation or abnormal noise

If the freshwater system was winterized, fill the tanks and run the system until all traces of antifreeze are gone. Flushing the lines completely clears out residue and leaves the water clean before the system goes back into normal use.
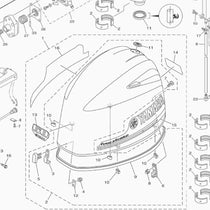
Checking for Critters and Obstructions
Before starting the engine, pull the cowling and take a deliberate look through the engine compartment. Time in storage allows insects and small animals to move in, and it does not take much debris to interfere with airflow or create reliability issues once the motor is running. Check the air intake areas, tight pockets where insects tend to build, and any signs of rodents or ants along wiring runs.
Problems here are easy to miss. Restricted airflow, damaged insulation, or debris that you can’t see may seem unimportant but can turn into overheating or electrical issues once the engine is working under load.
Use a flashlight to inspect deeper areas, including the exhaust path through the prop hub and outlet. If the propeller was not sealed during storage, removing it provides a clearer view of the exhaust passage and helps ensure nothing is lodged where it could restrict flow or cause overheating once the engine is started.
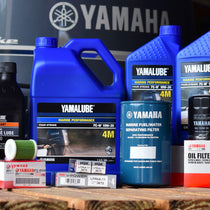
Inspecting Yamaha Outboard Engine Fluids
Even if the fuel was treated and service was done before storage, fluids still need to be checked before the engine is run. Take the time to go through each system carefully.
- Draw a fuel sample into a clear container and check for water, debris, or separation
- Inspect fuel hoses, clamps, and primer bulb for cracking, stiffness, or wear
- Reconnect fuel lines and prime the system until firm
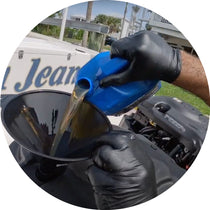
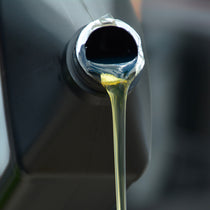
- Check engine oil level and look for signs of contamination or overfilling
- Inspect gear lube level and condition closely
Gear lube should be checked carefully. During the last service, small air pockets can remain trapped in the lower unit and settle over time, leaving room for the level to drop slightly. Verifying the level now also confirms the lubricant stayed clean and that no water made its way into the lower unit during storage.
Flushing and Running the Yamaha Outboard
After you complete inspections, connect a hose and prepare to run the engine.
Before starting:
- Ensure the flush attachment fits securely
- Confirm water flow is steady and unrestricted
- Clear the area around the propeller
From the helm:
- Lower the engine to its normal running position
- Set the controls to neutral and attach the safety lanyard
- Turn the key to the run position and watch the gauges
- Verify the battery voltage is within a normal resting range
- Start the engine and let it idle smoothly
- Listen closely for any unusual noise or vibration
- Confirm charging voltage rises as expected
- Check for steady water flow from the tell-tale and exhaust
Once the engine shuts down, allow it to sit briefly and recheck the oil level. After checking, replace the cowling and remove the flush setup.
Trailer Inspection Before Heading to the Ramp
The trailer is an extension of the boat, and problems here can upend a trip before it starts. Carefully inspect your trailer to eliminate roadside and ramp delays.
Inspect the following:
- Verify all lights and signals are working properly
- Check tire pressure and overall tread condition
- Inspect sidewalls for cracking, dry rot, or age-related wear
- Test brake operation, if the trailer is equipped with brakes
- Inspect wheel bearings and confirm proper lubrication
- Make sure lug nuts are tightened evenly
- Examine winch straps and tie-downs for wear or dry rot
- Confirm smooth winch operation and apply lubrication if needed
- Check tongue jack movement for binding or stiffness
- Inspect hitch lock and safety chains for secure attachment
- Look over the wiring harness for damage or loose connections
- Inspect rollers, bunks, and bunk carpeting for wear or deterioration
- Confirm hitch latch security and the receiver pin is properly seated
- Verify registration status is current
Final Thoughts
Preparing a Yamaha outboard for the season comes down to removing unknowns. Working through the boat methodically lets you catch small problems early, when they are still simple to fix, instead of discovering them after something fails at the ramp or offshore.
When the engine runs clean on the hose, electrical systems behave as expected, fluids check out, and the trailer is ready for the road, the first launch feels uneventful in the best way. That sense of reliability is what proper preseason prep is really about.