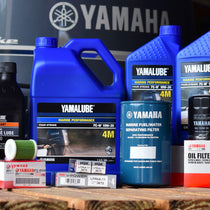
Yamaha fuel system maintenance is a critical aspect of 100-hour service. Depending on your application and style of boat, you likely have a fuel-water separating filter aboard your vessel. If you have not seen one, simply follow the routing of your fuel hose from the engine rigging tube backward through the boat. These vary in shape and manufacturer, so be sure to order the identical replacement filter. Use a filter wrench to loosen the existing filter element and use caution when removing it as it will be filled with gasoline.
Shop Recommended Products
A clear plastic or glass container is helpful to dump the filter into and to examine the contents. A small amount of debris is common, as is a small amount of water after the fuel has had a moment to settle. Larger amounts of water would warrant further investigation. If your filter’s mounting location allows it, pre-fill the replacement filter with some gasoline to make re-priming the fuel system easier later. It is also advisable to use a small amount of grease to lubricate the o-ring prior to installation. Spin on and hand tighten only about a half turn to snug.
Continue your Yamaha fuel system maintenance by moving back to the engine and locate the filter element in the clear plastic bowl on the front of your block. Depending on your engine model, this filter cup may be removed by using a special cup wrench – or standard tools and a little caution. If applicable, unplug the water-in-fuel sensor and spin the cup off the housing. Again, drain into your clear container and examine the fuel. If your main water separator was free from water, this filter should be as well. Inspect the o-ring on the top of the filter cup and lightly grease for ease of installation or replace if needed. Replace the filter element with a fresh one and reinstall the cup. Use the cup wrench to tighten. Locate your engine’s primer bulb and use the primer to pump up the fuel system. You should observe gasoline entering and filling the filter cup. Check for leaks and prime until the bulb becomes firm. As a tip, primer bulbs work best when the arrow points up, so use any extra hose in the line to help you tilt the bulb vertical.
If you are not running Yamalube Ring Free on a constant basis, the 100-hour service interval is a great time for a “shock treatment.” Ring Free is a fuel system conditioner that also helps to remove carbon deposits. A standard dose is 1 oz per 10 gallons, but if you are not running the product all the time, you can double that ratio for more cleaning power. Simply pour the Ring Free into the fuel tank fill and go run the boat - no additional work is needed. It is advisable to inspect your fuel tank fill’s o-ring for damage when you add Ring Free as a damaged o-ring can allow water from rain or boat washing into your fuel system.
If you will be storing your boat for the season after service is performed, and liberal application of Yamaha’s STOR-RITE Fogging Oil and the addition of Yamalube Fuel Stabilizer & Conditioner Plus is highly recommended.
Yamaha 100-Hour Maintenance Step # 1 - Oil Change
How to Perform Yamaha Outboard 100-Hour Service
eBook available for both 4-stroke and 2-stroke outboards.
Did Your Fuel-Water Separating Filter Had a Large Amount of Water in It?
The problem lies in the very physical nature of ethanol. Ethanol prefers to bond with water vs. the gasoline it has been introduced into and subsequently pumped into your boat’s fuel tank. Through the natural process of condensation, being in a water environment and accidental introduction of water into the fuel system, water finds itself in the fuel tank.
Read more about why ethanol gasoline is a problem for outboard engines


