Performing a gear lube change is critical for maintaining engine performance and longevity. This simple maintenance step helps keep the engine’s gears adequately lubricated, reducing wear and promoting efficient operation. This guide provides a clear and concise step-by-step process to assist you in changing the gear lube, helping to keep your Yamaha outboard engine functioning effectively and preventing potential damage or costly repairs in the future.
The following Yamaha Gear Lube Change video and steps outlined below apply to these Yamaha Outboard models:
- F150
- F175 / F200
- F200 / F225 / F250 3.3L V6
- F225 / F250 / F300 4.2L V6
- F350 V8
- VF115
- VF150
- VF200 / VF225 / VF250
What You’ll Need for the Job
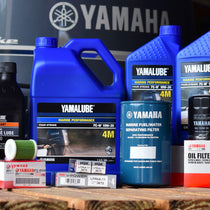
- Yamaha gear lube kit (contains gear lube & drain gasket)
- Gear lube pump
- Drain pain
- Rags/towels
- Screwdriver
Why It’s Essential to Change Gear Lube
Regularly changing your Yamalube gear lube is a fundamental step in prolonging the lifespan of your outboard engine. This essential maintenance task minimizes internal wear and tear, keeping the engine’s components in peak condition. Fresh gear lube safeguards the lower unit gears continuously exposed to intense friction and heat. It is a protective barrier, mitigating wear and preventing damaging metal-to-metal contact. This protection is pivotal in averting premature gear failure, ensuring the components maintain optimal functionality.
In addition to gear protection, changing gear lube enhances fuel efficiency. Well-lubricated gears operate with reduced friction, promoting smoother performance and lower fuel consumption. Ignoring this crucial maintenance can increase drag within the engine, leading to heightened fuel use and unnecessary financial expenses. Moreover, timely gear lube changes ensure smooth and precise shifting, contributing to a seamless and enjoyable boating experience. It prevents rough gear shifts that can negatively impact overall engine performance.
Gear lube also acts as an effective sealant, preventing water from infiltrating the engine’s lower unit. Over time, as gear lube deteriorates, its effectiveness as a sealant and lubricant diminishes, allowing water to seep in. This intrusion can lead to corrosion and significant internal damage, threatening the engine’s integrity.
With the correct viscosity, fresh lube also plays a vital role in maintaining the engine’s optimal temperature. It helps dissipate the heat generated by the moving parts, preventing the unit from overheating and guarding against potential catastrophic failures.
In summary, consistent gear lube changes are imperative for ensuring your outboard engine’s longevity, efficiency, and smooth operation. It’s a small investment of time and care that pays off by safeguarding your engine’s performance and durability.
When Should You Change the Gear Lube on a Yamaha Outboard Engine
Regular gear lube changes ensure your Yamaha outboard engine’s smooth and efficient operation. This proactive maintenance prevents expensive future repairs, safeguarding your engine and wallet. Use the following general principles to schedule your maintenance:
- General Timeline: Aim to change the gear lube every 100 hours of operation or at least once a year, whichever occurs first.
- Consider Operating Conditions: Increase the change frequency if your engine often operates under extreme conditions, such as high speeds, heavy loads, or exposure to saltwater.
- Observe the Gear Lube: Check the lube’s color and consistency. If you notice milky or discolored lube, which indicates water contamination, change it immediately.
- Refer to the Owner’s Manual: Consult your engine’s manual for model-specific gear lube change intervals and procedures, ensuring warranty compliance and reinforcing engine longevity according to manufacturer’s guidelines.
Gear Lube Change Preparation: Essentials Checklist
- Gear Lube Pump: Ensure you have a specialized pump for filling gear oil from the bottom plug upwards.
- Yamaha Gear Lube: Only use the recommended gear lube for Yamaha outboard engines.
- Reservoir: Have a container ready to catch and collect old oil during drainage.
- Clean-Up Materials: Keep paper towels or rags at hand to clean any oil spills and remove metal shavings from the bottom plug.
- O-rings: Prepare new o-rings for the plugs, as Yamaha advises changing these with every gear lube replacement.
- Screwdriver: Have a screwdriver ready for various aspects of the process.

Step-by-Step Process for Changing Gear Lube in a Yamaha Outboard
- Locate the Drain Screws: Find the drain screws situated right behind the pickup screen. They are generally at the very bottom.
- Loosen the Top Screw: Begin by loosening the top screw first. This tactic helps with any buildup of pressure and potential gear lube spillage.
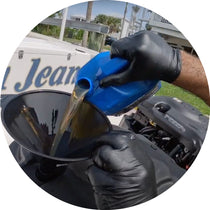
- Drain the Old Gear Lube: Drain the old gear lube into a reservoir to avoid spills or mess.
- Check the Drained Lube: Pay attention to the color and consistency of the drained lube. A darker shade may indicate that seals under the water pump need to be replaced.
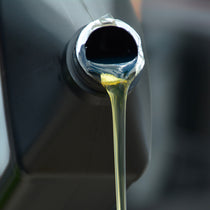
- Insert the HD Gear Lube: Make sure the engine is level and not at an angle. Proceed to fill the engine with HD gear lube. Ensure a slow, steady fill to prevent the formation of air pockets. Continue to fill until lube slowly spills out of the top screw. Following the initial fill, wait about five minutes before topping off the gear lube again to ensure the gear case is thoroughly filled.
- Replace Seals: Always opt for Yamaha’s original drain and fill seals, steering clear of aftermarket products. Make it a practice to replace these seals each time you remove a drain or fill screw.
- Clean the Bottom Drain Screw: Before reinserting, make sure the magnet on the end of the bottom drain screw is entirely clean. Properly clean the threads to circumvent cross-threading issues.
- Reinsert the Top Drain Screw: Start threading manually and proceed to tighten the screws. Secure the top vent screw first to minimize gear lube loss when inserting the bottom drain screw. After tightening it manually, use a screwdriver to complete the process. For enhanced grip, use a rag while tightening the screws, ensuring they are secure enough to withstand the engine’s vibration.
- Reinsert the Bottom Screw: Initially insert by hand and then complete the process using a screwdriver.
- Final Check: As a last step, verify that all screws are adequately tightened to prevent loosening, which could result in the loss of gear lube.
In conclusion, regular gear lube changes are an essential maintenance task to ensure your Yamaha outboard engine’s smooth and efficient operation. By following the detailed steps outlined in this guide, you can effectively change the gear lube, helping to prolong the life of your engine and prevent unwanted issues or repairs. By making sure gears are adequately lubricated, you’ll contribute to the overall performance and reliability of your outboard motor, allowing you to enjoy trouble-free operation and peace of mind during your ventures on the water.
Important Note
Always consult your engine’s owner’s manual for instructions and information specific to your engine. If you need clarification on changing gear lube, consult a Yamaha-certified mechanic.
PartsVu and Platinum Mobile Marine Partnership
Huge thanks to Frank Cutri, the owner and operator of Platinum Mobile Marine, a mobile mechanic service serving the Lee County, Florida, area, for partnering with PartsVu on the Boat Maintenance Matters series.
Together, we are working hard to build a library of step-by-step instructions on common outboard motor repair and maintenance tasks.