-

-

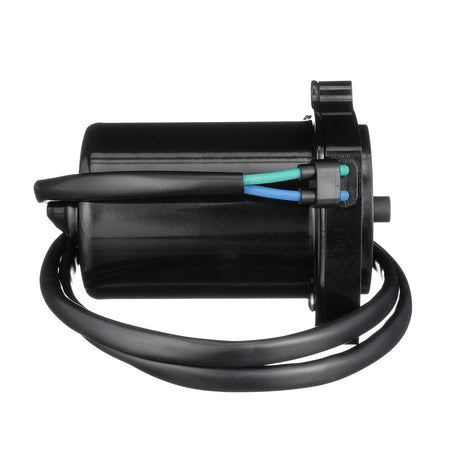
Mercury
Mercury - Analog Trim Sender - Port Mount - Fits 40-60 Family 2, 75-115 EFI & Optimax - 8M0098273
$69.49$81.83Unit price /Unavailable -

Mercury
$72.89$85.83Unit price /Unavailable -

-

-

-

-

-

-

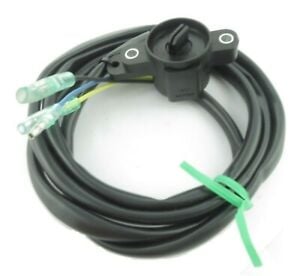
Mercury
Mercury - Power Trim Sender - Fits All SmartCraft Compatible Engines - 859187A1
$129.86$152.88Unit price /Unavailable -

-

-

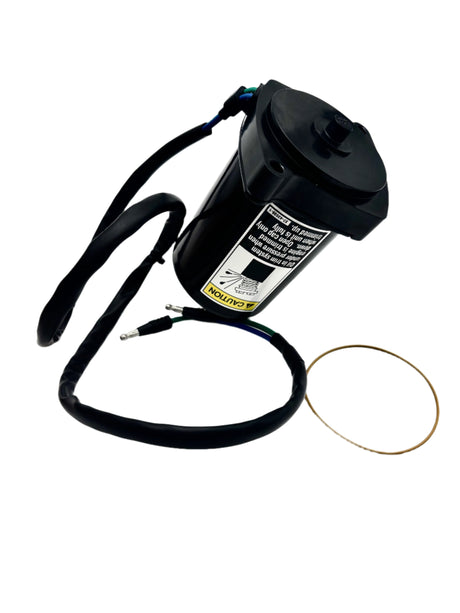
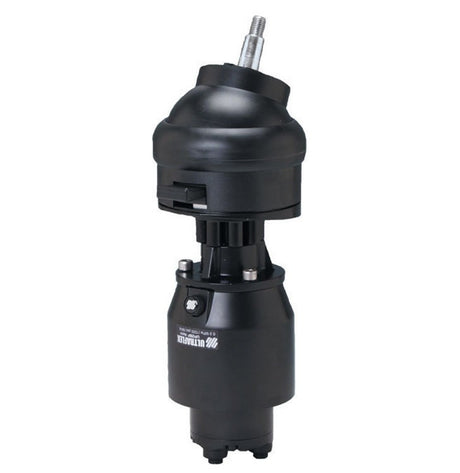
Mercury
Mercury - Hydraulic Helm Kit - Tilt - Basic System - Fits Single Engine 75-150 HP OB - 8M0050099
$673.76$840.14Unit price /Unavailable -

-

-

-

-

-

-

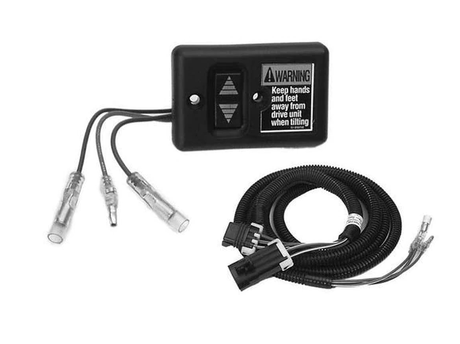
Mercury
$497.49Unit price /Unavailable -

-

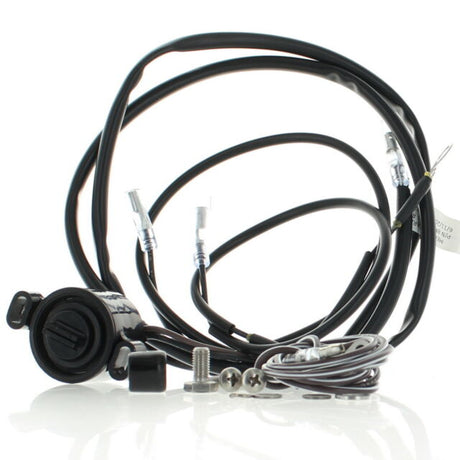
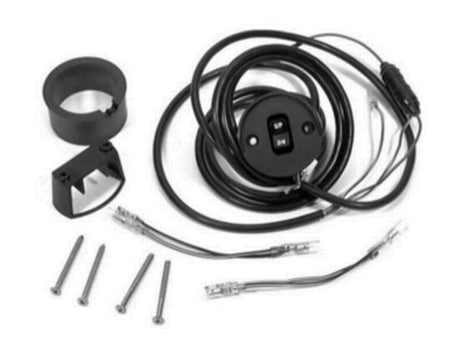
Mercury
Mercury - Power Trim Switch Kit - Rocker Style - 10 Ft Harness - Fits Mercury/Mariner - 87-18286A18
$149.13$151.91Unit price /Unavailable -

-

-

-

-

-

-

-

-

-

-

-

-

-


-

FREE SHIPPING
on all orders over $99!
-

45-DAY RETURNS
so you can get the right parts
-

REWARDS ON EVERY PURCHASE
earn up to 4.5% back
-

PREMIER CUSTOMER SERVICE
throughout your buying journey
Mercury Marine Outboard Trim and Tilt Components Resources and Information
Maintaining and replacing worn or faulty trim and tilt components is essential for maximizing the performance and longevity of your Mercury outboard motor. PartsVu.com provides a comprehensive range of certified Mercury outboard trim and tilt components. We also offer cost-effective multipacks of these components, allowing you to save money while ensuring top-notch performance. If you're troubleshooting trim response issues, a faulty Mercury trim switch is one of the most common causes—and often one of the easiest components to replace.
At PartsVu.com, we take pride in offering a diverse selection of certified Mercury marine engine trim and tilt components that precisely match the specifications of your Mercury outboard motor.
We also regularly publish helpful resources to help you maintain your Mercury outboard motor, such as:
- Mercury Outboard Engine Schematics
- Mercury Outboard 100-hour Service Guides
- Mercury Outboard Serial Number Lookup
Signs of a bad Mercury trim switch:
- No response when pressing trim buttons
- Intermittent up/down functionality
- Clicking sound with no movement
- Works only in one direction (up/down)
Mercury Marine Outboard Trim and Tilt Parts FAQs
What are the most common Mercury outboard power trim problems?
There are several common power trim problems that can occur in Mercury outboards. These include:
- Trim motor failure: The trim motor is responsible for raising and lowering the outboard motor. When it fails, the motor will be stuck in one position. Common causes of trim motor failure include worn brushes, corroded connections, and water intrusion.
- Leaking hydraulic fluid: The power trim system relies on hydraulic fluid to operate. If there is a leak in the system, the fluid level will drop and the trim system will not work properly. Common causes of leaks include damaged hoses, worn seals, and corroded fittings.
- Trim cylinder failure: The trim cylinders are responsible for moving the outboard motor up and down. If one or both of the cylinders fail, the motor will be stuck in one position. Common causes of cylinder failure include worn seals and damaged cylinders.
- Control switch failure: The Mercury trim switch controls the motor’s tilt angle. If the switch wears out or gets corroded, the trim system may stop responding entirely.
- Electrical issues: The power trim system relies on a complex electrical system to operate. If there is a problem with the wiring or electrical components, the system will not work properly. Common causes of electrical issues include corroded connections, damaged wires, and failed relays.
It's important to regularly inspect and maintain your power trim system to prevent these common problems from occurring.
Shop PartsVu for Mercury Marine Engine Trim and Tilt Parts today!
Where is the Mercury trim switch located?
The Mercury trim switch is typically located on the throttle control handle or the side of the engine, depending on the model. It allows you to raise or lower the outboard’s trim angle with the touch of a button. Some boats also have a secondary switch at the bow or helm for convenience.
Where is the trim sender on a Mercury outboard?
The location of the trim sender on a Mercury outboard can vary depending on the model and year of the engine. However, it is typically located near the hydraulic trim cylinders, either on the transom assembly or on the engine bracket. The trim sender is responsible for transmitting the position of the outboard motor's trim to the trim gauge on the dashboard.
Shop PartsVu for Trim Sender | Mercury Outboard
How often should I add power trim to Mercury outboard engines?
Power trim refers to the mechanism that allows you to adjust the tilt and trim of your outboard motor, and it does not require any additional fluid to be added. However, the hydraulic fluid that powers the trim system should be checked and topped off as needed on a regular basis. The frequency of checking and topping off the fluid will depend on how frequently you use your boat and the condition of the fluid. It is recommended to check the fluid level every 50 hours of use or at least once per boating season. If the fluid level is consistently low, it may be an indication of a leak that needs to be addressed.
How to adjust trim gauge on Mercury outboard?
To adjust the trim gauge on a Mercury outboard, you will need a trim gauge and a screwdriver. Follow the steps below:
- Turn off the outboard and remove the trim gauge from the dashboard.
- On the back of the trim gauge, locate the trim gauge adjustment switch.
- Use a screwdriver to adjust the switch to the desired setting.
- Turn on the outboard and test the trim gauge to see if it is showing the correct reading.
- If the trim gauge is still not showing the correct reading, adjust the switch until the gauge is displaying the correct reading.
- Once the trim gauge is adjusted properly, replace it back into the dashboard.
Note: The location of the trim gauge adjustment switch may vary depending on the manufacturer of the gauge. Consult the manufacturer's instructions for specific guidance on adjusting the trim gauge.
When do Mercury outboard trim motor problems require professional servicing by a Mercury dealer?
There are several scenarios where professional servicing by a Mercury dealer may be required for trim motor problems in a Mercury outboard:
- Electrical issues: If there is a problem with the electrical components of the trim motor, such as the wiring or the switch, it may be difficult to diagnose and repair without the proper tools and expertise.
- Mechanical problems: If the problem with the trim motor is due to mechanical issues, such as a broken or worn out gear, it may require specialized tools and knowledge to repair or replace.
- Warranty coverage: If the outboard is still under warranty, attempting to repair the trim motor yourself may void the warranty, so it's important to check with your dealer before attempting any repairs.
In general, if the problem with the trim motor is beyond your level of experience or expertise, it's best to take your outboard to a certified Mercury dealer for servicing. They have the knowledge, tools, and experience necessary to diagnose and repair any issues with the trim motor.
If the trim gauge not working on Mercury outboard, is it dangerous to take it on the water?
If the trim gauge is not working on your Mercury outboard, it is not necessarily dangerous to take it on the water. However, it is important to be aware of the position of your outboard motor's trim and adjust it accordingly while on the water. The trim gauge is a helpful tool for indicating the position of the outboard's trim, but it is not essential for safe operation. It is always best to have all of your boat's systems functioning properly, so it is recommended to have the trim gauge repaired or replaced as soon as possible.
How to change trim motor on Mercury outboard?
Changing the trim motor on a Mercury outboard can be a complicated process and is recommended to be done by a professional Mercury dealer or experienced mechanic. However, if you have the necessary skills and tools, here are the general steps to follow:
- Turn off the battery switch and disconnect the battery cables.
- Tilt the outboard up and lock it in the raised position.
- Remove the bolts that secure the trim motor to the outboard using a socket wrench.
- Disconnect the wiring harness and hydraulic hoses from the trim motor.
- Remove the trim motor from the outboard.
- Install the new trim motor onto the outboard and tighten the bolts to the manufacturer's recommended torque specification.
- Reconnect the wiring harness and hydraulic hoses to the trim motor.
- Lower the outboard and reconnect the battery cables.
- Test the trim motor to ensure it is working properly.
It is important to refer to the specific instructions for your Mercury outboard model and trim motor, as the process may vary depending on the year and size of your outboard. If you are unsure about any step of the process or encounter any problems, it is recommended to seek professional assistance.
Replacing a worn Mercury trim switch is a quick, high-impact fix for unresponsive trim or intermittent control. Ensure you use the correct replacement for your control box or binnacle mount configuration to maintain seamless trim functionality.
What tools are needed for adjusting trim tab on Mercury outboard engines?
To adjust the trim tab on a Mercury outboard engine, you will need the following tools:
- Screwdriver or Allen key: Depending on the type of trim tab on your Mercury outboard, you may need either a flathead screwdriver or an Allen key to adjust it.
- Pliers: You may need pliers to grip and turn the trim tab adjustment screw.
- Prop wrench: To make adjustments to the trim tab, you may need to remove the propeller. A prop wrench is necessary to do this safely.
- Safety goggles: It's important to wear safety goggles to protect your eyes when working with tools.
- Grease or lubricant: To ensure that the trim tab moves smoothly and doesn't get stuck, you may want to apply some grease or lubricant to the adjustment screw and other moving parts.
It's important to consult your Mercury outboard engine manual for specific instructions on adjusting the trim tab and to ensure that you have the correct tools for the job.
Where is the Mercury outboard trim relay location?
The location of the trim relay on a Mercury outboard can vary depending on the specific model and year of the engine. However, in general, the trim relay can usually be found in one of two places:
- Under the engine cowling: In many Mercury outboard engines, the trim relay is located inside the engine cowling. To access the relay, you will need to remove the cowling by unscrewing the bolts or clips that hold it in place.
- In the boat's electrical system: In some cases, the trim relay may be located outside of the engine, in the boat's electrical system. This could be under the console, in a relay box, or in another location near the helm or steering system.
It's important to consult your Mercury outboard engine manual or a certified Mercury mechanic to determine the exact location of the trim relay for your engine.
If my Mercury outboard power trim cylinder is dented, can it be used safely?
It is not recommended to use a Mercury outboard power trim cylinder that is dented. The power trim cylinder is a critical component of the trim system, and any damage to it can cause issues with the operation and safety of the boat. A dented cylinder may leak hydraulic fluid or may cause the trim system to malfunction, resulting in unpredictable boat handling and a potential safety hazard.
If you notice that your power trim cylinder is dented or damaged, it is important to have it inspected and repaired or replaced by a qualified technician before using your boat again. Continuing to use the boat with a damaged power trim cylinder can lead to more severe problems and potentially compromise the safety of you and your passengers.
How long does a Mercury outboard trim sender installation take?
The time it takes to install a Mercury outboard trim sender can vary depending on the specific model of the engine and the skill level of the person performing the installation. In general, however, it should take between 1-2 hours to install a trim sender on a Mercury outboard.
The installation process typically involves locating and accessing the trim sender on the engine, disconnecting the wiring and removing the old sender (if applicable), installing the new sender in its place, reconnecting the wiring, and testing the new sender to ensure it is functioning properly.
It is important to consult your Mercury outboard engine manual or a certified Mercury mechanic for specific instructions on installing a trim sender on your engine. Proper installation is critical to the safe and reliable operation of your boat, so it's important to take the time to do it correctly.
What are some signs that my Mercury outboard power trim relief valve needs to be replaced?
There are several signs that may indicate that the power trim relief valve on your Mercury outboard needs to be replaced. One of the most common symptoms is difficulty in controlling the trim, as the valve may be stuck or not regulating pressure properly. You may also notice that the engine is not tilting or trimming as smoothly as it should, or that it is making unusual noises during operation. Another sign of a faulty relief valve is oil leakage around the valve itself or from the trim system
Can a faulty Mercury outboard propeller be offset by trimming and tilting the engine?
Trimming and tilting the engine can help compensate for certain issues, such as imbalances caused by uneven weight distribution or changes in water conditions, but it cannot completely offset a faulty propeller. A faulty propeller can cause various problems, including poor acceleration, reduced top speed, decreased fuel efficiency, and excessive vibrations. Therefore, it's important to ensure that the propeller is in good condition and properly matched to the engine for optimal performance.
How to replace trim motor on Mercury outboard?
Replacing a trim motor on a Mercury outboard can be a bit complicated and may require some mechanical knowledge. Here are the general steps:
- Disconnect the battery to avoid electrical shock or damage.
- Remove the bolts or screws that hold the trim motor in place.
- Carefully remove the old trim motor and disconnect any wires connected to it.
- Connect the wires to the new trim motor, ensuring that they are connected properly.
- Place the new trim motor into position and secure it with the bolts or screws.
- Reconnect the battery and test the new trim motor.
It's important to note that the specific steps for replacing a trim motor on a Mercury outboard may vary depending on the model and year of the motor. If you're not confident in your abilities to perform this repair, it's best to seek the assistance of a professional mechanic.
Where can I learn more about Mercury Outboard Parts?
PartsVu understands that boaters want to learn how to perform their own Mercury outboard maintenance. From maintaining your Mercury outboard, Mercury sterndrive, and MerCruiser engines, there’s always something new to learn and save money. That’s why PartsVu offers our comprehensive blog, The Partsvu Xchange.
Read up on the latest developments in boating, as well as search for everything you need to know about Mercury outboard motor maintenance.
To get you off to a good start, these are some of the most important articles on Mercury Marine Outboard Trim and Tilt Components, how to adjust trim tab on Mercury outboard, and more:
- How To Protect Your Mercury Outboard
- Selecting & Installing M-Y Wedge Transom Supports
- Mercury Outboard Grease Points – Here's How
- Transom Saver, Outboard Motor Support - PartsVu
Is the type of lower unit gear lube the same for a Mercury 4-stroke outboard lower unit as well as a Mercury 2-stroke outboard lower unit?
No, the type of lower unit gear lube is not always the same for a Mercury 4-stroke outboard lower unit and a Mercury 2-stroke outboard lower unit. The manufacturer generally specifies the type of gear lube recommended for each model and type of engine, and it's important to follow these guidelines to ensure proper lubrication and protection of the lower unit. It's recommended to consult the owner's manual or contact a certified Mercury dealer for specific recommendations on the appropriate gear lube for your outboard.
Which types of Mercury outboard power trim repairs should be performed only by Mercury dealers and marine mechanics?
Any major repairs or replacements to the power trim system of a Mercury outboard should be performed by a certified Mercury dealer or marine mechanic. This includes repairs or replacements to the hydraulic pump, cylinders, hoses, and valves, as well as any electrical components such as relays, switches, and wiring. These Mercury outboard trim system components require specialized knowledge and equipment to diagnose and repair, and attempting to do so without proper training and tools could result in further damage or injury.
What is the role of the Mercury outboard trim sensor?
The Mercury outboard trim sensor is a component that provides feedback to the boat operator regarding the position of the outboard motor's tilt and trim angle. It communicates with the trim gauge on the dash of the boat, allowing the operator to monitor the outboard's position and adjust it as necessary. This information is critical to the safe operation of the boat, particularly in rough or changing water conditions. The trim sensor is typically mounted on the hydraulic steering cylinder and contains a potentiometer that translates the movement of the steering cylinder into an electrical signal that is sent to the trim gauge.
Shop PartsVu for Trim Sensor | Mercury Outboard
Where is the Mercury outboard power trim relay location?
The location of the Mercury outboard power trim relay can vary depending on the specific model and year of the outboard motor. However, in most cases, the relay can be found either in a fuse/relay box mounted on the motor or on a bracket near the motor's power trim and tilt assembly. It is recommended to consult the owner's manual or a certified Mercury mechanic to determine the exact location of the power trim relay on a particular outboard motor.
What do Mercury outboard trim relays do?
Mercury outboard trim relays are electrical components that control the power to the trim and tilt system of the outboard motor. They receive signals from the trim switch, either on the throttle or on the control box, and activate the trim motor to move the outboard motor up or down. The relays also protect the system from electrical damage by interrupting the power when an overload or short circuit occurs. If the trim and tilt system fails to operate, it could be due to a faulty relay, and replacement of the faulty relay may be necessary.
How do I make a Mercury outboard trim sender adjustment?
To make a Mercury outboard trim sender adjustment, follow these steps:
- Turn off the boat's electrical power and remove the negative cable from the battery.
- Locate the trim sender on the engine. It is usually on the back of the motor and may be attached to the hydraulic ram.
- Loosen the screws holding the trim sender in place. Use a multi-meter to check the resistance of the sender when the motor is trimmed all the way up and when it is trimmed all the way down. Record the readings.
- Adjust the trim sender by moving it up or down until the resistance readings are within the specified range provided in the engine manual. Tighten the screws to hold the sender in place.
- Reconnect the negative battery cable and turn on the electrical power.
- Test the trim to ensure it is working properly.
It is important to note that incorrect trim sender adjustments can cause inaccurate readings and potentially damage the engine or boat. It is recommended to consult the engine manual or a qualified mechanic for guidance on making trim sender adjustments.
How is a 1978 Mercury outboard power trim different than a 1989 Mercury outboard power trim?
There are several differences between a 1978 Mercury outboard power trim and a 1989 Mercury outboard power trim. The major difference is that the 1978 models used a hydraulic system, while the 1989 models used an electric system. The hydraulic system used a pump to force fluid through hoses to the trim cylinders, which would then move the engine up and down. The electric system used a motor and gear assembly to directly move the engine up and down. Additionally, the 1989 models had a more advanced control system that allowed for precise and gradual adjustment of the engine trim angle, while the 1978 models had a simpler system with only a few preset trim angles.
If I'm on the water and my Mercury outboard power trim hoses leak, how do I fix them?
If you're on the water and your Mercury outboard power trim hoses are leaking, the best course of action is to stop the engine immediately and head back to shore to avoid causing further damage. Once you're on shore, you can assess the damage and determine the best course of action.
If the hoses are simply loose, you may be able to tighten them back in place. However, if the hoses are damaged or worn out, they will need to be replaced. It's important to use the correct type of hose for your Mercury outboard, so be sure to consult your owner's manual or a certified Mercury dealer for the appropriate replacement parts.
How do I protect my tilt and trim relay for Mercury outboard from corrosion?
To protect your tilt and trim relay for Mercury outboard from corrosion, you can take the following steps:
- Keep the relay dry: The first step is to keep the relay dry at all times. Moisture is one of the biggest culprits when it comes to causing corrosion, so make sure the relay stays dry.
- Use a protective coating: Another option is to use a protective coating to prevent moisture and corrosion from affecting the relay. A dielectric grease or protective spray can be used to coat the relay.
- Use a protective cover: A protective cover can be used to shield the relay from water and moisture. There are many different types of covers available, ranging from simple plastic covers to more advanced weather-resistant covers.
- Regularly inspect and maintain the relay: Finally, it's important to regularly inspect and maintain the relay to make sure it's functioning properly. If you notice any signs of corrosion or damage, take action immediately to prevent further damage.
How do I service my Mercury 4-stroke outboard fuel system?
Depending on your application and style of boat, your Mercury fuel system may include a fuel-water separating filter. If you have not seen one, follow the routing of your fuel hose from the engine rigging tube backward through the boat. These vary in shape and manufacturer, so be sure to order the identical replacement size for the best fit. Verado owners may not have an inline filter as the engine has a water separator under the cowling.
Use a filter wrench to loosen the existing filter element and use caution when removing it as it will be filled with gasoline. A clear plastic or glass container is helpful to dump the filter and examine the contents. A small amount of debris is common, as is a small amount of water after the fuel has had a moment to settle. More significant amounts of water would warrant further investigation.
If your filter’s mounting location allows it, pre-fill the replacement filter with some gasoline to make re-priming the fuel system easier. It is also advisable to use a small amount of grease or engine oil to lubricate the o-ring before installation. Spin on and hand tighten only about a half turn to snug.
Move back to the engine and locate the filter element(s) on the engine. The scope of this service will only include the low-pressure fuel filter and fuel water separator if applicable by model. Mercury recommends that owners do not service their high-pressure fuel filters. Depending on your engine model, the water separator filter (or castle filter) may be removed by using a wrench, standard tools, and a little caution. Unplug the water-in-fuel sensor if applicable and spin the cap off of the housing. Replace the filter element with a fresh one, lube the o-ring with grease or oil, and carefully reinstall the cap.
For most other models, the low-pressure fuel filter is inline, where the fuel supply line passes down the side of the cowling. On applicable models, locate the Schrader valve on the fuel system. Cover the valve with a rag or towel and depress the valve stem to vent the pressure from the system before service.
PartsVu carries a complete assortment of trim and tilt components for Mercury outboard maintenance, including conveniently pre-assembled trim & tilt kits. These kits include snap rings, oil seals, backup rings, o-rings, trim dust seals, trim cylinder end screws, and anything else specific outboard models require.


